Flutter 小技巧之实现一个精美的动画相册效果
今天的小技巧主要是「抄袭」一个充满设计感的相册控件,如下图所示是 gskinner 开源应用 wonderous 里一个相片集的实现效果,可以看到相册支持上下左右滑动,并带有高亮展示的动画效果,而且相册整体布局可以超出屏幕滚动,因为是开源的 App, 我们只需要「照搬」就可以实现一摸一样的效果,那么如果要实现这样的效果,你第一反应是用什么基础控件?
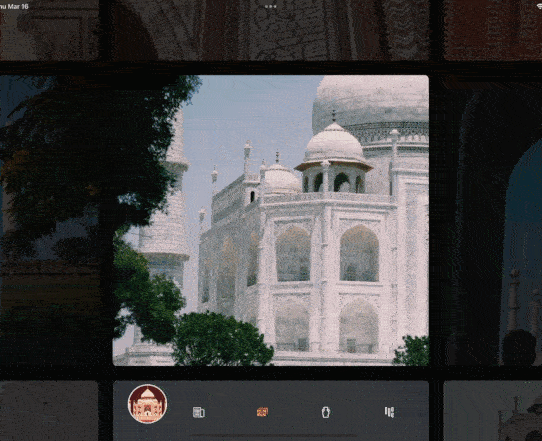
因为需要支持上下左右自由滑动,可能大家第一反应会是 Table ,还是嵌套两个 ListView ?但是从上面的效果体验上看,控件滑动的过程并不是一个正常 Scroll 控件的线性效果,因为它并不是「跟随手指滑动」的状态。
既然是开源代码,我们通过源码可以发现它是用了 GridView 来实现,这也是这个效果里最有趣的点,一个 GridView 如何变成一个带有动画的 Photo Gallery 。
所以本篇的核心是分析 wonderous 里的 Photo Gallery 是如何实现的,并剥离出简单代码。
Photo Gallery
要实现上述的 Photo Gallery 效果,主要需要解决三个方面核心的要点:
- 1、
GridView所在区域的上下左右要超出屏幕 - 2、
GridView如何实现上下左右自由切换 - 3、高亮展示选中 Item 的动画效果
首先是第一点的方案肯定是 OverflowBox ,因它支持解放 Child 的布局约束,允许 Child 溢出父布局,因为前面的 Photo Gallery 在水平方向设定是 5 个 Item,而 GridView 是默认是上下滑动,所以可以简单的设定一个 maxWidth 和 maxHeight 来作为 Child 超出屏幕后大小。
OverflowBox(maxWidth: _gridSize * imgSize.width + padding * (_gridSize - 1),maxHeight: _gridSize * imgSize.height + padding * (_gridSize - 1),alignment: Alignment.center,child:
可以看到「超出屏幕」这个需求还是比较简单,接下里就是 「GridView 如何实现上下左右自由切换」这个问题。
小技巧 1 :在合适场合使用 OverflowBox 可以溢出屏幕
默认情况下 GridView 肯定只支持一个方向滑动,所以干脆我们禁止 GridView 的滑动逻辑,让 GridView 只管布局,后面滑动逻辑通过自定义的 GestureDetector 来实现。
GridView.count(physics: NeverScrollableScrollPhysics(),
如下代码所示,我们通过封装 GestureDetector 来实现手势识别,这里核心的要点就是 _maybeTriggerSwipe 的实现,它的作用就是得到手势滑动的方向结果,对于滑动具体大于 threshold 的参数,通过「采样」将数据变成 -1、 0 、 1 这样的结果来代表方向:
- Offset(1.0, 0.0) 是手指右滑
- Offset(-1.0, 0.0) 是手指左滑
- Offset(0.0, 1.0) 是手指下滑
- Offset(0.0, -1.0) 是手指上滑
class _EightWaySwipeDetectorState extends State {Offset _startPos = Offset.zero;Offset _endPos = Offset.zero;bool _isSwiping = false;void _resetSwipe() {_startPos = _endPos = Offset.zero;_isSwiping = false;}///这里主要是返回一个 -1 ~ 1 之间的数值,具体用于判断方向/// Offset(1.0, 0.0)  是手指右滑/// Offset(-1.0, 0.0) 是手指左滑/// Offset(0.0, 1.0)  是手指下滑/// Offset(0.0, -1.0) 是手指上滑void _maybeTriggerSwipe() {// Exit early if we're not currently swipingif (_isSwiping == false) return;/// 开始和结束位置计算出移动距离// Get the distance of the swipeOffset moveDelta = _endPos - _startPos;final distance = moveDelta.distance;/// 对比偏移量大小是否超过了 threshold ,不能小于 1// Trigger swipe if threshold has been exceeded, if threshold is < 1, use 1 as a minimum value.if (distance >= max(widget.threshold, 1)) {// Normalize the dx/dy values between -1 and 1moveDelta /= distance;// Round the dx/dy values to snap them to -1, 0 or 1, creating an 8-way directional vector.Offset dir = Offset(moveDelta.dx.roundToDouble(),moveDelta.dy.roundToDouble(),);widget.onSwipe?.call(dir);_resetSwipe();}}void _handleSwipeStart(d) {_isSwiping = true;_startPos = _endPos = d.localPosition;}void _handleSwipeUpdate(d) {_endPos = d.localPosition;_maybeTriggerSwipe();}void _handleSwipeEnd(d) {_maybeTriggerSwipe();_resetSwipe();}@overrideWidget build(BuildContext context) {return GestureDetector(behavior: HitTestBehavior.translucent,onPanStart: _handleSwipeStart,onPanUpdate: _handleSwipeUpdate,onPanCancel: _resetSwipe,onPanEnd: _handleSwipeEnd,child: widget.child);}
}
小技巧 2:Offset.distance 可以用来作为判断偏移量的大小。
知道了手势方向之后,我们就可以处理 GridView 应该如何滑动,这里我们需要先知道当然应该展示哪个 index 。
默认情况下我们需要展示的是最中间的 Item ,例如有 25 个 Item 的时候, index 应该在第 13 ,然后我们再根据方向来调整下一个 index 是哪个:
- dy > 0 ,就是手指下滑,也就是页面要往上,那么 index 就需要 -1,反过来就是 + 1
- dx > 0 ,就是手指右滑,也就是页面要往左,那么 index 就需要 -1,反过来就是 + 1
// Index starts in the middle of the grid (eg, 25 items, index will start at 13)
int _index = ((_gridSize * _gridSize) / 2).round();/// Converts a swipe direction into a new indexvoid _handleSwipe(Offset dir) {// Calculate new index, y swipes move by an entire row, x swipes move one index at a timeint newIndex = _index;/// Offset(1.0, 0.0)  是手指右滑/// Offset(-1.0, 0.0) 是手指左滑/// Offset(0.0, 1.0)  是手指下滑/// Offset(0.0, -1.0) 是手指上滑/// dy > 0 ,就是手指下滑,也就是页面要往上,那么 index 就需要 -1,反过来就是 + 1if (dir.dy != 0) newIndex += _gridSize * (dir.dy > 0 ? -1 : 1);/// dx > 0 ,就是手指右滑,也就是页面要往左,那么 index 就需要 -1,反过来就是 + 1if (dir.dx != 0) newIndex += (dir.dx > 0 ? -1 : 1);///这里判断下 index 是不是超出位置// After calculating new index, exit early if we don't like it...if (newIndex < 0 || newIndex > _imgCount - 1)return; // keep the index in rangeif (dir.dx < 0 && newIndex % _gridSize == 0)return; // prevent right-swipe when at right sideif (dir.dx > 0 && newIndex % _gridSize == _gridSize - 1)return; // prevent left-swipe when at left side/// 响应_lastSwipeDir = dir;HapticFeedback.lightImpact();_setIndex(newIndex);}void _setIndex(int value, {bool skipAnimation = false}) {if (value < 0 || value >= _imgCount) return;setState(() => _index = value);}
通过手势方向,我们就可以得到下一个需要展示的 Item 的 index 是什么,然后就可以使用 Transform.translate 来移动 GridView 。
是的,在这个 Photo Gallery 里的滑动效果是通过 Transform.translate 实现,核心之一也就是根据方向计算其应该偏移的 Offset 位置:
- 首先根据水平方向的数量 / 2 得到一个
halfCount - 计算出一个 Item 加上 Padding 大小的
paddedImageSize - 计算出默认中心位置的 top-left 的
originOffset - 计算出要移动的 index 所在的行和列位置
indexedOffset - 最后两者相减(因为
indexedOffset里是负数),得到一个相对的偏移Offset
/// Determine the required offset to show the current selected index.
/// index=0 is top-left, and the index=max is bottom-right.
Offset _calculateCurrentOffset(double padding, Size size) {/// 获取水平方向一半的大小,默认也就是 2.0,因为 floorToDoubledouble halfCount = (_gridSize / 2).floorToDouble();/// Item 大小加上 Padding,也就是每个 Item 的实际大小Size paddedImageSize = Size(size.width + padding, size.height + padding);/// 计算出开始位置的 top-left// Get the starting offset that would show the top-left image (index 0)final originOffset = Offset(halfCount * paddedImageSize.width, halfCount * paddedImageSize.height);/// 得到要移动的 index 所在的行和列位置// Add the offset for the row/colint col = _index % _gridSize;int row = (_index / _gridSize).floor();/// 负数计算出要移动的 index 的 top-left 位置,比如 index 比较小,那么这个 indexedOffset 就比中心点小,相减之后 Offset 就会是正数/// 是不是有点懵逼?为什么正数 translate 会往 index 小的 方向移动??/// 因为你代入的不对,我们 translate 移动的是整个 GridView/// 正数是向左向下移动,自然就把左边或者上面的 Item 显示出来final indexedOffset =Offset(-paddedImageSize.width * col, -paddedImageSize.height * row);return originOffset + indexedOffset;
}
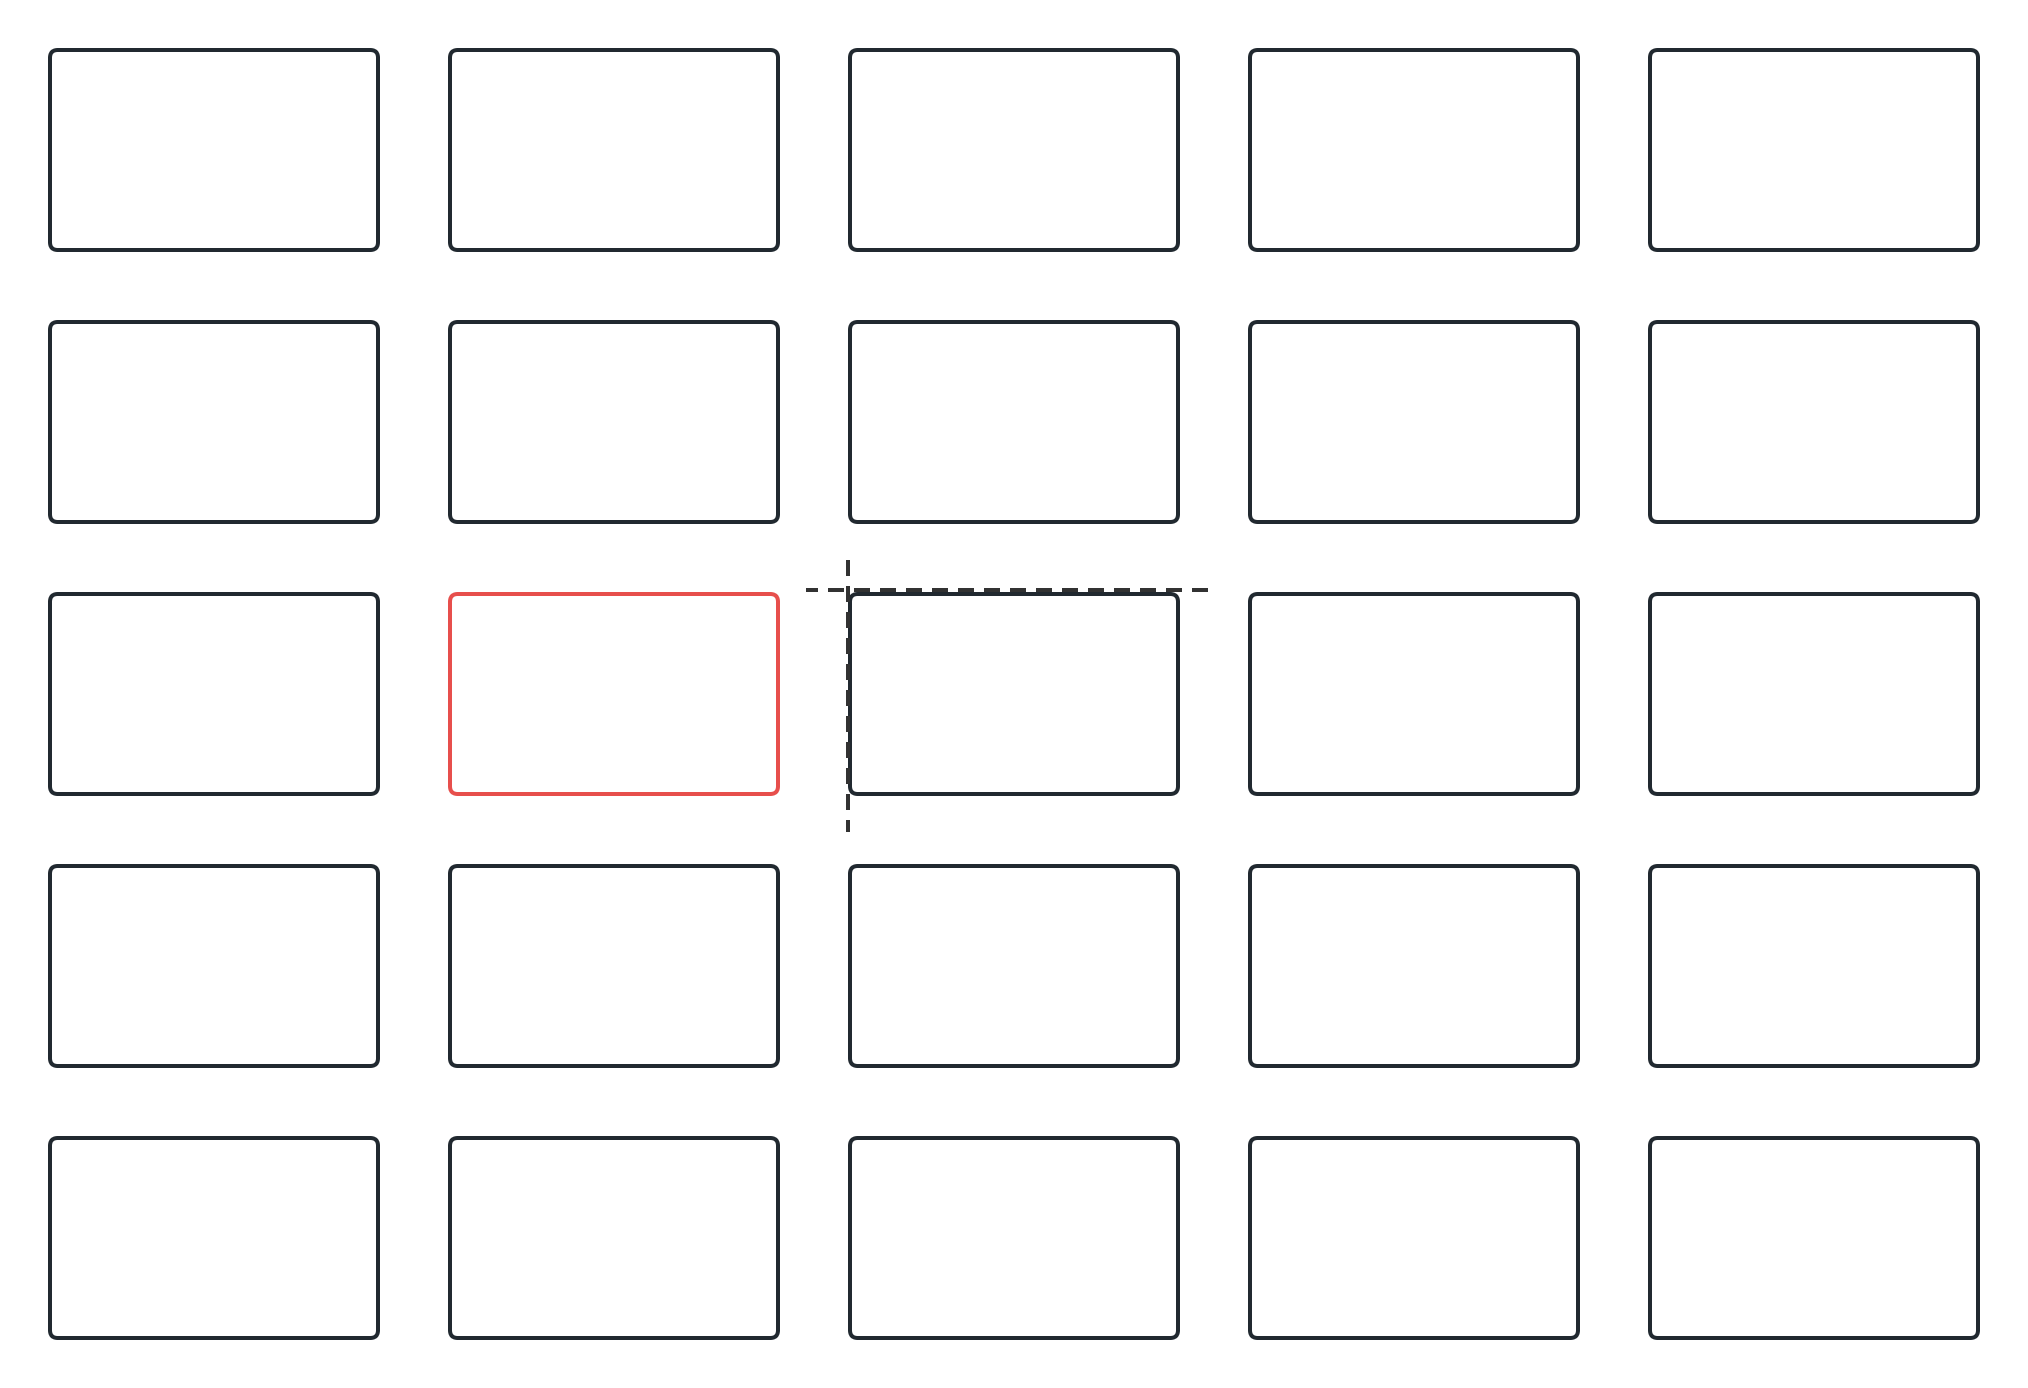
具体点如下图所示,比如在 5 x 5 的 GridView 下:
- 通过
halfCount和paddedImageSize计算会得到黑色虚线的位置 - 红色是要展示的 index 位置,也就是通过
col和row计算出来的indexedOffset就是红色框的左上角,在上面代码里用过的是负数 - 当
originOffset + indexedOffset,其实就是得到两者之差的 currentOffset,比如这时候得到是一个dx为正数的Offset,整个GridView要向左移动一个 currentOffset ,自然就把红色框放到中间显示。
更形象的可以看这个动画,核心就是整个 GridView 在发生了偏移,从把需要展示的 Item 移动到中心的位置,利用 Transform.translate 来实现类似滑动的效果,当然实现里还会用到 TweenAnimationBuilder 来实现动画过程,
TweenAnimationBuilder(tween: Tween(begin: gridOffset, end: gridOffset),duration: offsetTweenDuration,curve: Curves.easeOut,builder: (_, value, child) =>Transform.translate(offset: value, child: child),child: GridView.count(physics: NeverScrollableScrollPhysics(),
解决完移动,最后就是实现蒙层和高亮动画效果,这个的核心主要是通过 flutter_animate 包和 ClipPath 实现,如下代码所示:
- 使用
Animate并在上面添加一个具有透明度的黑色Container - 利用
CustomEffect添加自定义动画 - 在动画里利用
ClipPath,并通过自定义CustomClipper结合动画 value 实现PathOperation.difference的「挖空」效果
动画效果就是根据
Animate的 value 得到的cutoutSize,默认是从1 - 0.25 * x开始,这里的 x 是滑动方向,最终表现就是从 0.75 到 1 的过程,所以动画会根据方向有一个从 0.75 到 1 的展开效果。
@override
Widget build(BuildContext context) {return Stack(children: [child,// 用 ClipPath 做一个动画抠图Animate(effects: [CustomEffect(builder: _buildAnimatedCutout,curve: Curves.easeOut,duration: duration)],key: animationKey,onComplete: (c) => c.reverse(),// 用一个黑色的蒙层,这里的 child 会变成 effects 里 builder 里的 child// 也就是黑色 Container 会在 _buildAnimatedCutout 作为 ClipPath 的 childchild: IgnorePointer(child: Container(color: Colors.black.withOpacity(opacity))),),],);
}/// Scales from 1 --> (1 - scaleAmt) --> 1
Widget _buildAnimatedCutout(BuildContext context, double anim, Widget child) {// controls how much the center cutout will shrink when changing imagesconst scaleAmt = .25;final size = Size(cutoutSize.width * (1 - scaleAmt * anim * swipeDir.dx.abs()),cutoutSize.height * (1 - scaleAmt * anim * swipeDir.dy.abs()),);return ClipPath(clipper: _CutoutClipper(size), child: child);
}class _CutoutClipper extends CustomClipper {_CutoutClipper(this.cutoutSize);final Size cutoutSize;@overridePath getClip(Size size) {double padX = (size.width - cutoutSize.width) / 2;double padY = (size.height - cutoutSize.height) / 2;return Path.combine(PathOperation.difference,Path()..addRect(Rect.fromLTWH(0, 0, size.width, size.height)),Path()..addRRect(RRect.fromLTRBR(padX,padY,size.width - padX,size.height - padY,Radius.circular(6),),)..close(),);}@overridebool shouldReclip(_CutoutClipper oldClipper) =>oldClipper.cutoutSize != cutoutSize;
}
从这里可以看到,其实高亮的效果就是在黑色的蒙层上,利用 PathOperation.difference 「挖」出来一个空白的 Path 。
小技巧 3 :
PathOperation.difference可以用在需要「镂空」 的场景上。
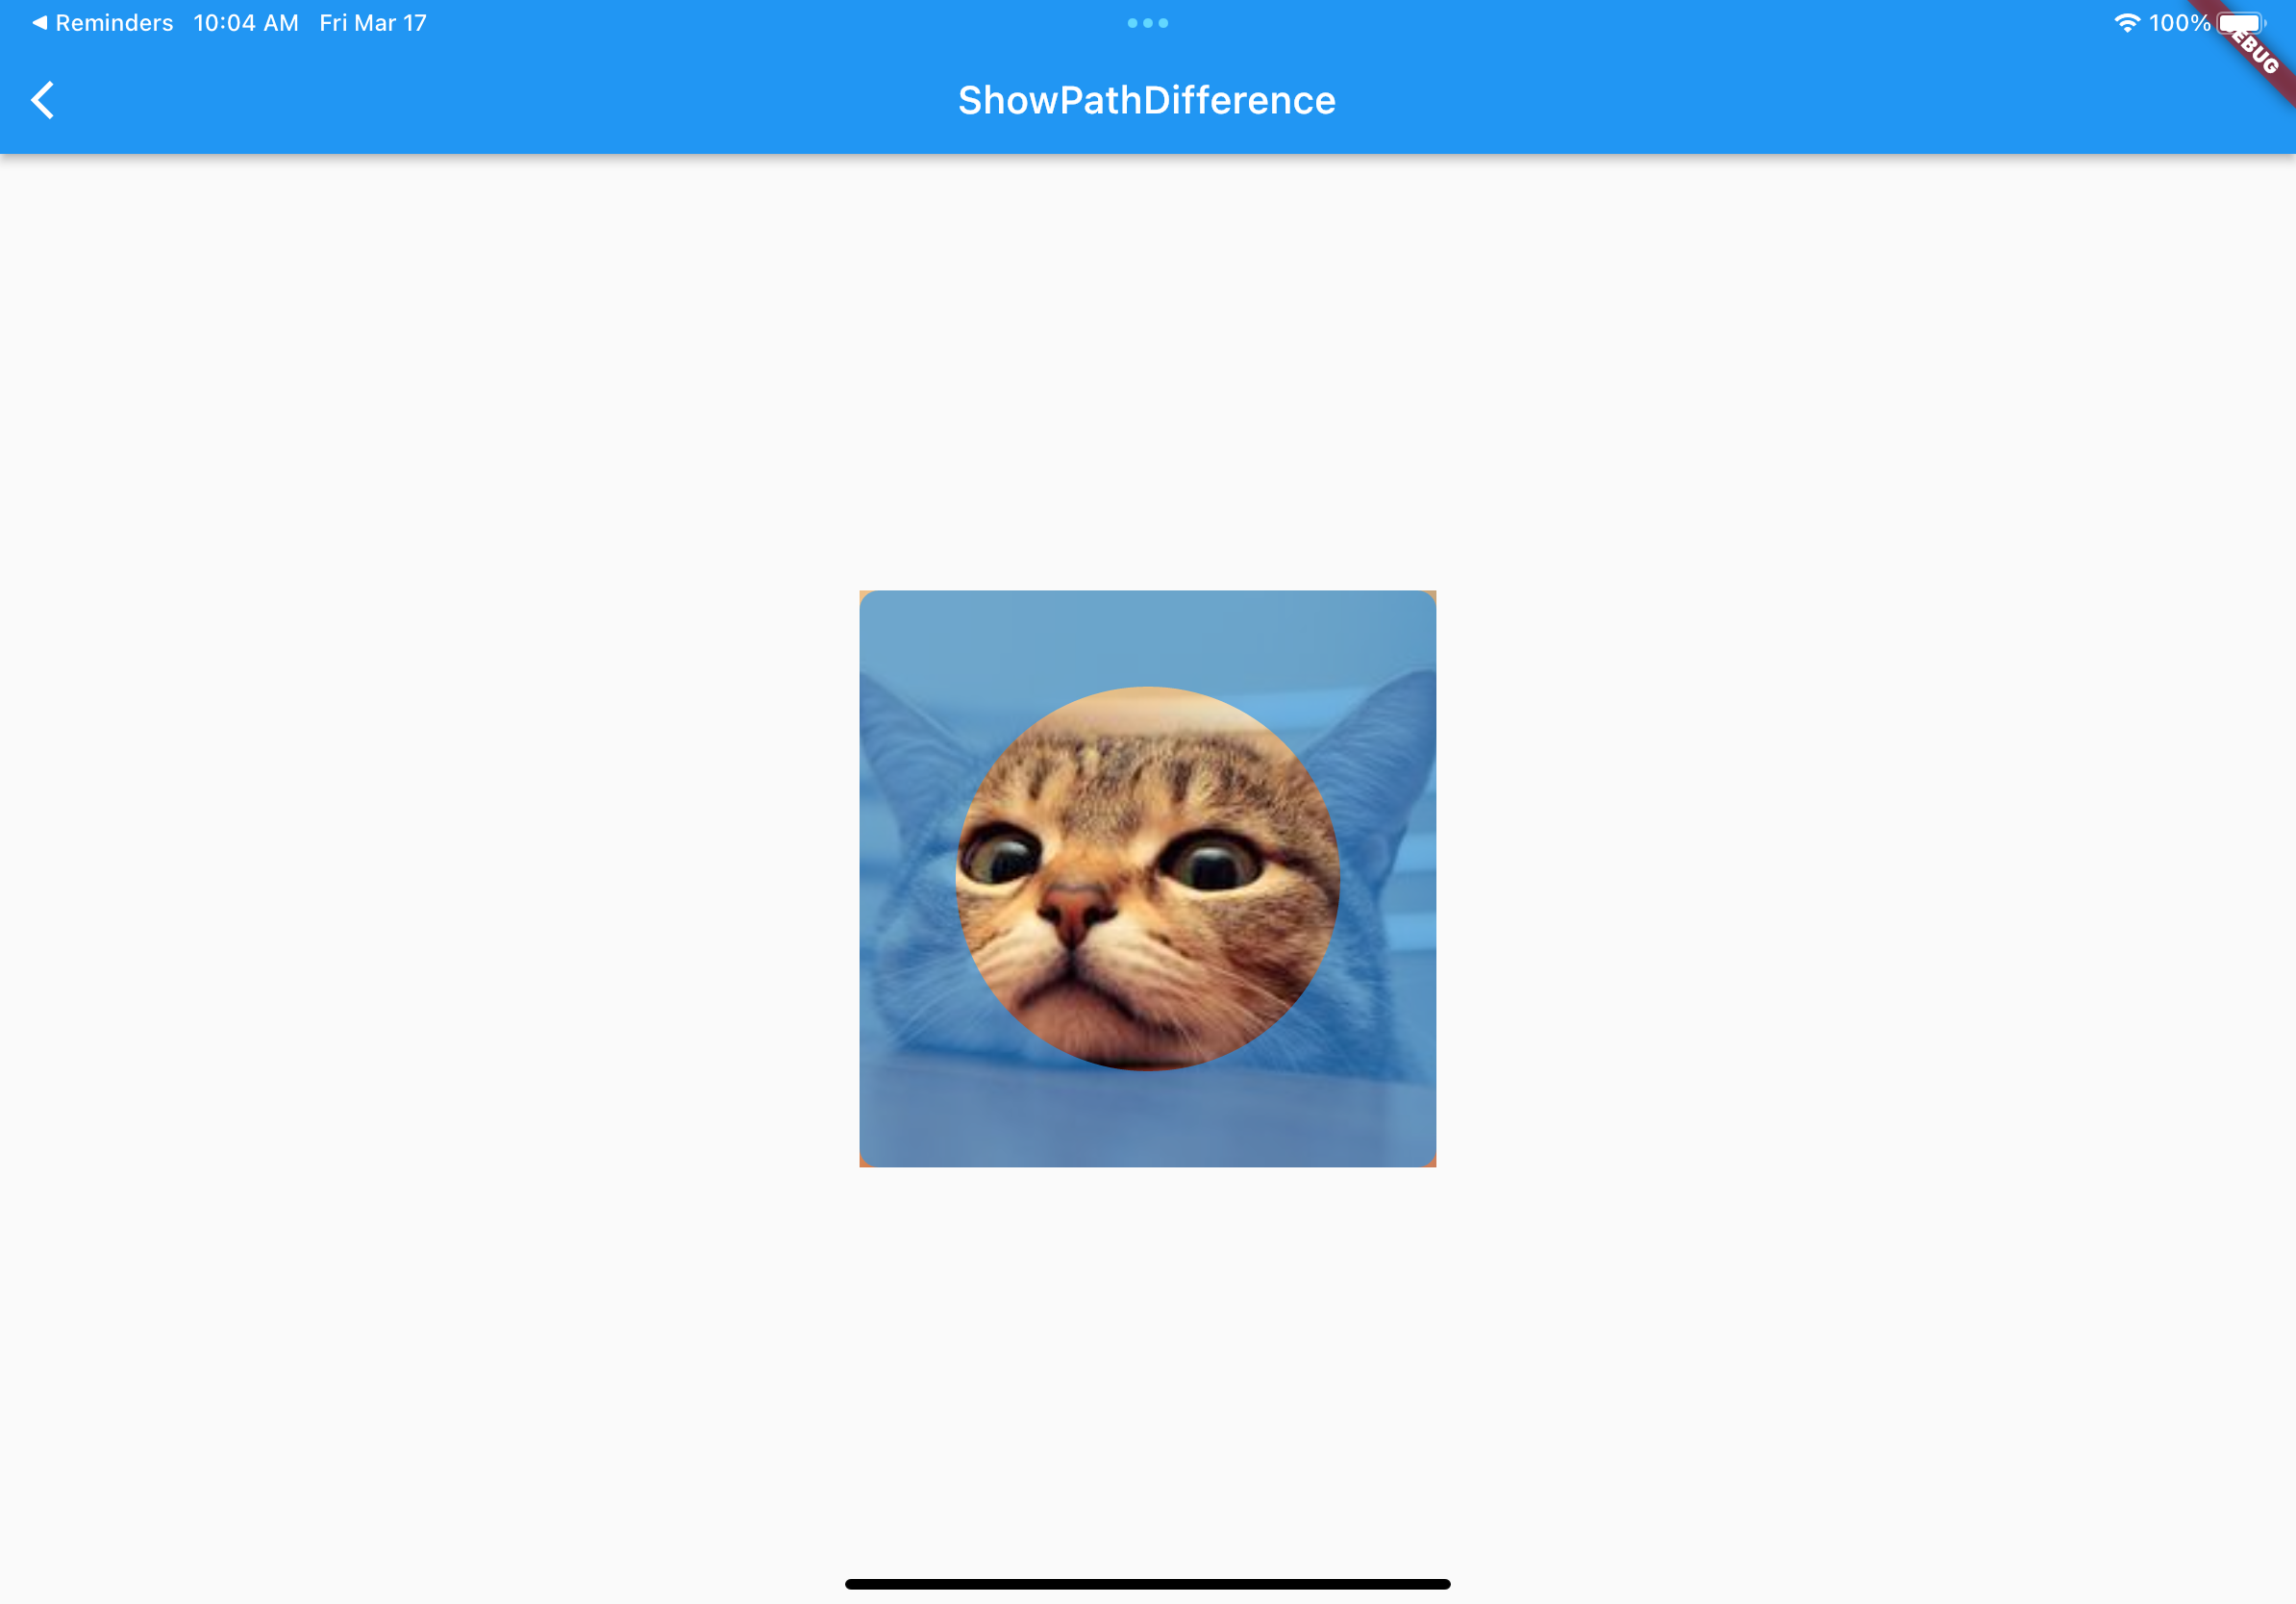
更直观的可以参考一下例子,就是对两个路径进行 difference 操作,,利用 Rect2 把 Rect1 中间给消除掉,得到一个中间 「镂空」的绘制 Path。
class ShowPathDifference extends StatelessWidget {@overrideWidget build(BuildContext context) {return Scaffold(appBar: AppBar(title: Text('ShowPathDifference'),),body: Stack(alignment: Alignment.center,children: [Center(child: Container(width: 300,height: 300,decoration: BoxDecoration(image: DecorationImage(fit: BoxFit.cover,image: AssetImage("static/gsy_cat.png"),),),),),Center(child: CustomPaint(painter: ShowPathDifferencePainter(),),),],),);}
}class ShowPathDifferencePainter extends CustomPainter {@overridevoid paint(Canvas canvas, Size size) {final paint = Paint();paint.color = Colors.blue.withAlpha(160);canvas.drawPath(Path.combine(PathOperation.difference,Path()..addRRect(RRect.fromLTRBR(-150, -150, 150, 150, Radius.circular(10))),Path()..addOval(Rect.fromCircle(center: Offset(0, 0), radius: 100))..close(),),paint,);}@overridebool shouldRepaint(CustomPainter oldDelegate) => false;
}
最终效果如下图所依,这里是把 wonderous 里关键部分代码剥离出来后的效果,因为 wonderous 并没有把这部分代码封装为 package ,所以我把这部分代码剥离出来放在了后面,感兴趣的可以自己运行试试效果。
源码
import 'dart:math';import 'package:flutter/material.dart';
import 'package:flutter/services.dart';
import 'package:flutter_animate/flutter_animate.dart';/// 来自  https://github.com/gskinnerTeam/flutter-wonderous-app 上的一个 UI 效果
class PhotoGalleryDemoPage extends StatefulWidget {const PhotoGalleryDemoPage({Key? key}) : super(key: key);@overrideState createState() => _PhotoGalleryDemoPageState();
}class _PhotoGalleryDemoPageState extends State {@overrideWidget build(BuildContext context) {return PhotoGallery();}
}class PhotoGallery extends StatefulWidget {const PhotoGallery({Key? key}) : super(key: key);@overrideState createState() => _PhotoGalleryState();
}class _PhotoGalleryState extends State {static const int _gridSize = 5;late List colorList;// Index starts in the middle of the grid (eg, 25 items, index will start at 13)int _index = ((_gridSize * _gridSize) / 2).round();Offset _lastSwipeDir = Offset.zero;bool _skipNextOffsetTween = false;///根据屏幕尺寸,决定 Padding 的大小,通过 scale 缩放_getPadding(Size size) {double scale = 1;final shortestSide = size.shortestSide;const tabletXl = 1000;const tabletLg = 800;const tabletSm = 600;const phoneLg = 400;if (shortestSide > tabletXl) {scale = 1.25;} else if (shortestSide > tabletLg) {scale = 1.15;} else if (shortestSide > tabletSm) {scale = 1;} else if (shortestSide > phoneLg) {scale = .9; // phone} else {scale = .85; // small phone}return 24 * scale;}int get _imgCount => pow(_gridSize, 2).round();Widget _buildImage(int index, Size imgSize) {/// Bind to collectibles.statesById because we might need to rebuild if a collectible is found.return ClipRRect(borderRadius: BorderRadius.circular(8),child: Container(width: imgSize.width,height: imgSize.height,color: colorList[index],),);}/// Converts a swipe direction into a new indexvoid _handleSwipe(Offset dir) {// Calculate new index, y swipes move by an entire row, x swipes move one index at a timeint newIndex = _index;/// Offset(1.0, 0.0)  是手指右滑/// Offset(-1.0, 0.0) 是手指左滑/// Offset(0.0, 1.0)  是手指下滑/// Offset(0.0, -1.0) 是手指上滑/// dy > 0 ,就是手指下滑,也就是页面要往上,那么 index 就需要 -1,反过来就是 + 1if (dir.dy != 0) newIndex += _gridSize * (dir.dy > 0 ? -1 : 1);/// dx > 0 ,就是手指右滑,也就是页面要往左,那么 index 就需要 -1,反过来就是 + 1if (dir.dx != 0) newIndex += (dir.dx > 0 ? -1 : 1);///这里判断下 index 是不是超出位置// After calculating new index, exit early if we don't like it...if (newIndex < 0 || newIndex > _imgCount - 1)return; // keep the index in rangeif (dir.dx < 0 && newIndex % _gridSize == 0)return; // prevent right-swipe when at right sideif (dir.dx > 0 && newIndex % _gridSize == _gridSize - 1)return; // prevent left-swipe when at left side/// 响应_lastSwipeDir = dir;HapticFeedback.lightImpact();_setIndex(newIndex);}void _setIndex(int value, {bool skipAnimation = false}) {print("######## $value");if (value < 0 || value >= _imgCount) return;_skipNextOffsetTween = skipAnimation;setState(() => _index = value);}/// Determine the required offset to show the current selected index./// index=0 is top-left, and the index=max is bottom-right.Offset _calculateCurrentOffset(double padding, Size size) {/// 获取水平方向一半的大小,默认也就是 2.0,因为 floorToDoubledouble halfCount = (_gridSize / 2).floorToDouble();/// Item 大小加上 Padding,也就是每个 Item 的实际大小Size paddedImageSize = Size(size.width + padding, size.height + padding);/// 计算出开始位置的 top-left// Get the starting offset that would show the top-left image (index 0)final originOffset = Offset(halfCount * paddedImageSize.width, halfCount * paddedImageSize.height);/// 得到要移动的 index 所在的行和列位置// Add the offset for the row/colint col = _index % _gridSize;int row = (_index / _gridSize).floor();/// 负数计算出要移动的 index 的 top-left 位置,比如 index 比较小,那么这个 indexedOffset 就比中心点小,相减之后 Offset 就会是正数/// 是不是有点懵逼?为什么正数 translate 会往 index 小的 方向移动??/// 因为你代入的不对,我们 translate 移动的是整个 GridView/// 正数是向左向下移动,自然就把左边或者上面的 Item 显示出来final indexedOffset =Offset(-paddedImageSize.width * col, -paddedImageSize.height * row);return originOffset + indexedOffset;}@overridevoid initState() {colorList = List.generate(_imgCount,(index) => Color((Random().nextDouble() * 0xFFFFFF).toInt()).withOpacity(1));super.initState();}@overrideWidget build(BuildContext context) {var mq = MediaQuery.of(context);var width = mq.size.width;var height = mq.size.height;bool isLandscape = mq.orientation == Orientation.landscape;///根据横竖屏状态决定 Item 大小Size imgSize = isLandscape? Size(width * .5, height * .66): Size(width * .66, height * .5);var padding = _getPadding(mq.size);final cutoutTweenDuration =_skipNextOffsetTween ? Duration.zero : Duration(milliseconds: 600) * .5;final offsetTweenDuration =_skipNextOffsetTween ? Duration.zero : Duration(milliseconds: 600) * .4;var gridOffset = _calculateCurrentOffset(padding, imgSize);gridOffset += Offset(0, -mq.padding.top / 2);//动画效果return _AnimatedCutoutOverlay(animationKey: ValueKey(_index),cutoutSize: imgSize,swipeDir: _lastSwipeDir,duration: cutoutTweenDuration,opacity: .7,child: SafeArea(bottom: false,// Place content in overflow box, to allow it to flow outside the parentchild: OverflowBox(maxWidth: _gridSize * imgSize.width + padding * (_gridSize - 1),maxHeight: _gridSize * imgSize.height + padding * (_gridSize - 1),alignment: Alignment.center,// 手势获取方向上下左右child: EightWaySwipeDetector(onSwipe: _handleSwipe,threshold: 30,// A tween animation builder moves from image to image based on current offsetchild: TweenAnimationBuilder(tween: Tween(begin: gridOffset, end: gridOffset),duration: offsetTweenDuration,curve: Curves.easeOut,builder: (_, value, child) =>Transform.translate(offset: value, child: child),child: GridView.count(physics: NeverScrollableScrollPhysics(),crossAxisCount: _gridSize,childAspectRatio: imgSize.aspectRatio,mainAxisSpacing: padding,crossAxisSpacing: padding,children:List.generate(_imgCount, (i) => _buildImage(i, imgSize)),)),),),),);}
}class EightWaySwipeDetector extends StatefulWidget {const EightWaySwipeDetector({Key? key,required this.child,this.threshold = 50,required this.onSwipe}): super(key: key);final Widget child;final double threshold;final void Function(Offset dir)? onSwipe;@overrideState createState() => _EightWaySwipeDetectorState();
}class _EightWaySwipeDetectorState extends State {Offset _startPos = Offset.zero;Offset _endPos = Offset.zero;bool _isSwiping = false;void _resetSwipe() {_startPos = _endPos = Offset.zero;_isSwiping = false;}///这里主要是返回一个 -1 ~ 1 之间的数值,具体用于判断方向/// Offset(1.0, 0.0)  是手指右滑/// Offset(-1.0, 0.0) 是手指左滑/// Offset(0.0, 1.0)  是手指下滑/// Offset(0.0, -1.0) 是手指上滑void _maybeTriggerSwipe() {// Exit early if we're not currently swipingif (_isSwiping == false) return;/// 开始和结束位置计算出移动距离// Get the distance of the swipeOffset moveDelta = _endPos - _startPos;final distance = moveDelta.distance;/// 对比偏移量大小是否超过了 threshold ,不能小于 1// Trigger swipe if threshold has been exceeded, if threshold is < 1, use 1 as a minimum value.if (distance >= max(widget.threshold, 1)) {// Normalize the dx/dy values between -1 and 1moveDelta /= distance;// Round the dx/dy values to snap them to -1, 0 or 1, creating an 8-way directional vector.Offset dir = Offset(moveDelta.dx.roundToDouble(),moveDelta.dy.roundToDouble(),);widget.onSwipe?.call(dir);_resetSwipe();}}void _handleSwipeStart(d) {_isSwiping = true;_startPos = _endPos = d.localPosition;}void _handleSwipeUpdate(d) {_endPos = d.localPosition;_maybeTriggerSwipe();}void _handleSwipeEnd(d) {_maybeTriggerSwipe();_resetSwipe();}@overrideWidget build(BuildContext context) {return GestureDetector(behavior: HitTestBehavior.translucent,onPanStart: _handleSwipeStart,onPanUpdate: _handleSwipeUpdate,onPanCancel: _resetSwipe,onPanEnd: _handleSwipeEnd,child: widget.child);}
}class _AnimatedCutoutOverlay extends StatelessWidget {const _AnimatedCutoutOverlay({Key? key,required this.child,required this.cutoutSize,required this.animationKey,this.duration,required this.swipeDir,required this.opacity}): super(key: key);final Widget child;final Size cutoutSize;final Key animationKey;final Offset swipeDir;final Duration? duration;final double opacity;@overrideWidget build(BuildContext context) {return Stack(children: [child,// 用 ClipPath 做一个动画抠图Animate(effects: [CustomEffect(builder: _buildAnimatedCutout,curve: Curves.easeOut,duration: duration)],key: animationKey,onComplete: (c) => c.reverse(),// 用一个黑色的蒙层,这里的 child 会变成 effects 里 builder 里的 child// 也就是黑色 Container 会在 _buildAnimatedCutout 作为 ClipPath 的 childchild: IgnorePointer(child: Container(color: Colors.black.withOpacity(opacity))),),],);}/// Scales from 1 --> (1 - scaleAmt) --> 1Widget _buildAnimatedCutout(BuildContext context, double anim, Widget child) {// controls how much the center cutout will shrink when changing imagesconst scaleAmt = .25;final size = Size(cutoutSize.width * (1 - scaleAmt * anim * swipeDir.dx.abs()),cutoutSize.height * (1 - scaleAmt * anim * swipeDir.dy.abs()),);print("### anim ${anim}   ");return ClipPath(clipper: _CutoutClipper(size), child: child);}
}/// Creates an overlay with a hole in the middle of a certain size.
class _CutoutClipper extends CustomClipper {_CutoutClipper(this.cutoutSize);final Size cutoutSize;@overridePath getClip(Size size) {double padX = (size.width - cutoutSize.width) / 2;double padY = (size.height - cutoutSize.height) / 2;return Path.combine(PathOperation.difference,Path()..addRect(Rect.fromLTWH(0, 0, size.width, size.height)),Path()..addRRect(RRect.fromLTRBR(padX,padY,size.width - padX,size.height - padY,Radius.circular(6),),)..close(),);}@overridebool shouldReclip(_CutoutClipper oldClipper) =>oldClipper.cutoutSize != cutoutSize;
}class ShowPathDifference extends StatelessWidget {@overrideWidget build(BuildContext context) {return Scaffold(appBar: AppBar(title: Text('ShowPathDifference'),),body: Stack(alignment: Alignment.center,children: [Center(child: Container(width: 300,height: 300,decoration: BoxDecoration(image: DecorationImage(fit: BoxFit.cover,image: AssetImage("static/gsy_cat.png"),),),),),Center(child: CustomPaint(painter: ShowPathDifferencePainter(),),),],),);}
}class ShowPathDifferencePainter extends CustomPainter {@overridevoid paint(Canvas canvas, Size size) {final paint = Paint();paint.color = Colors.blue.withAlpha(160);canvas.drawPath(Path.combine(PathOperation.difference,Path()..addRRect(RRect.fromLTRBR(-150, -150, 150, 150, Radius.circular(10))),Path()..addOval(Rect.fromCircle(center: Offset(0, 0), radius: 100))..close(),),paint,);}@overridebool shouldRepaint(CustomPainter oldDelegate) => false;
}