SpringBoot初级开发
一、SpringBoot简介
1. 入门案例
-
SpringBoot是由Pivotal团队提供的全新框架,其设计目的是用来简化Spring应用的初始搭建以及开发过程
-
原生开发SpringMVC程序过程
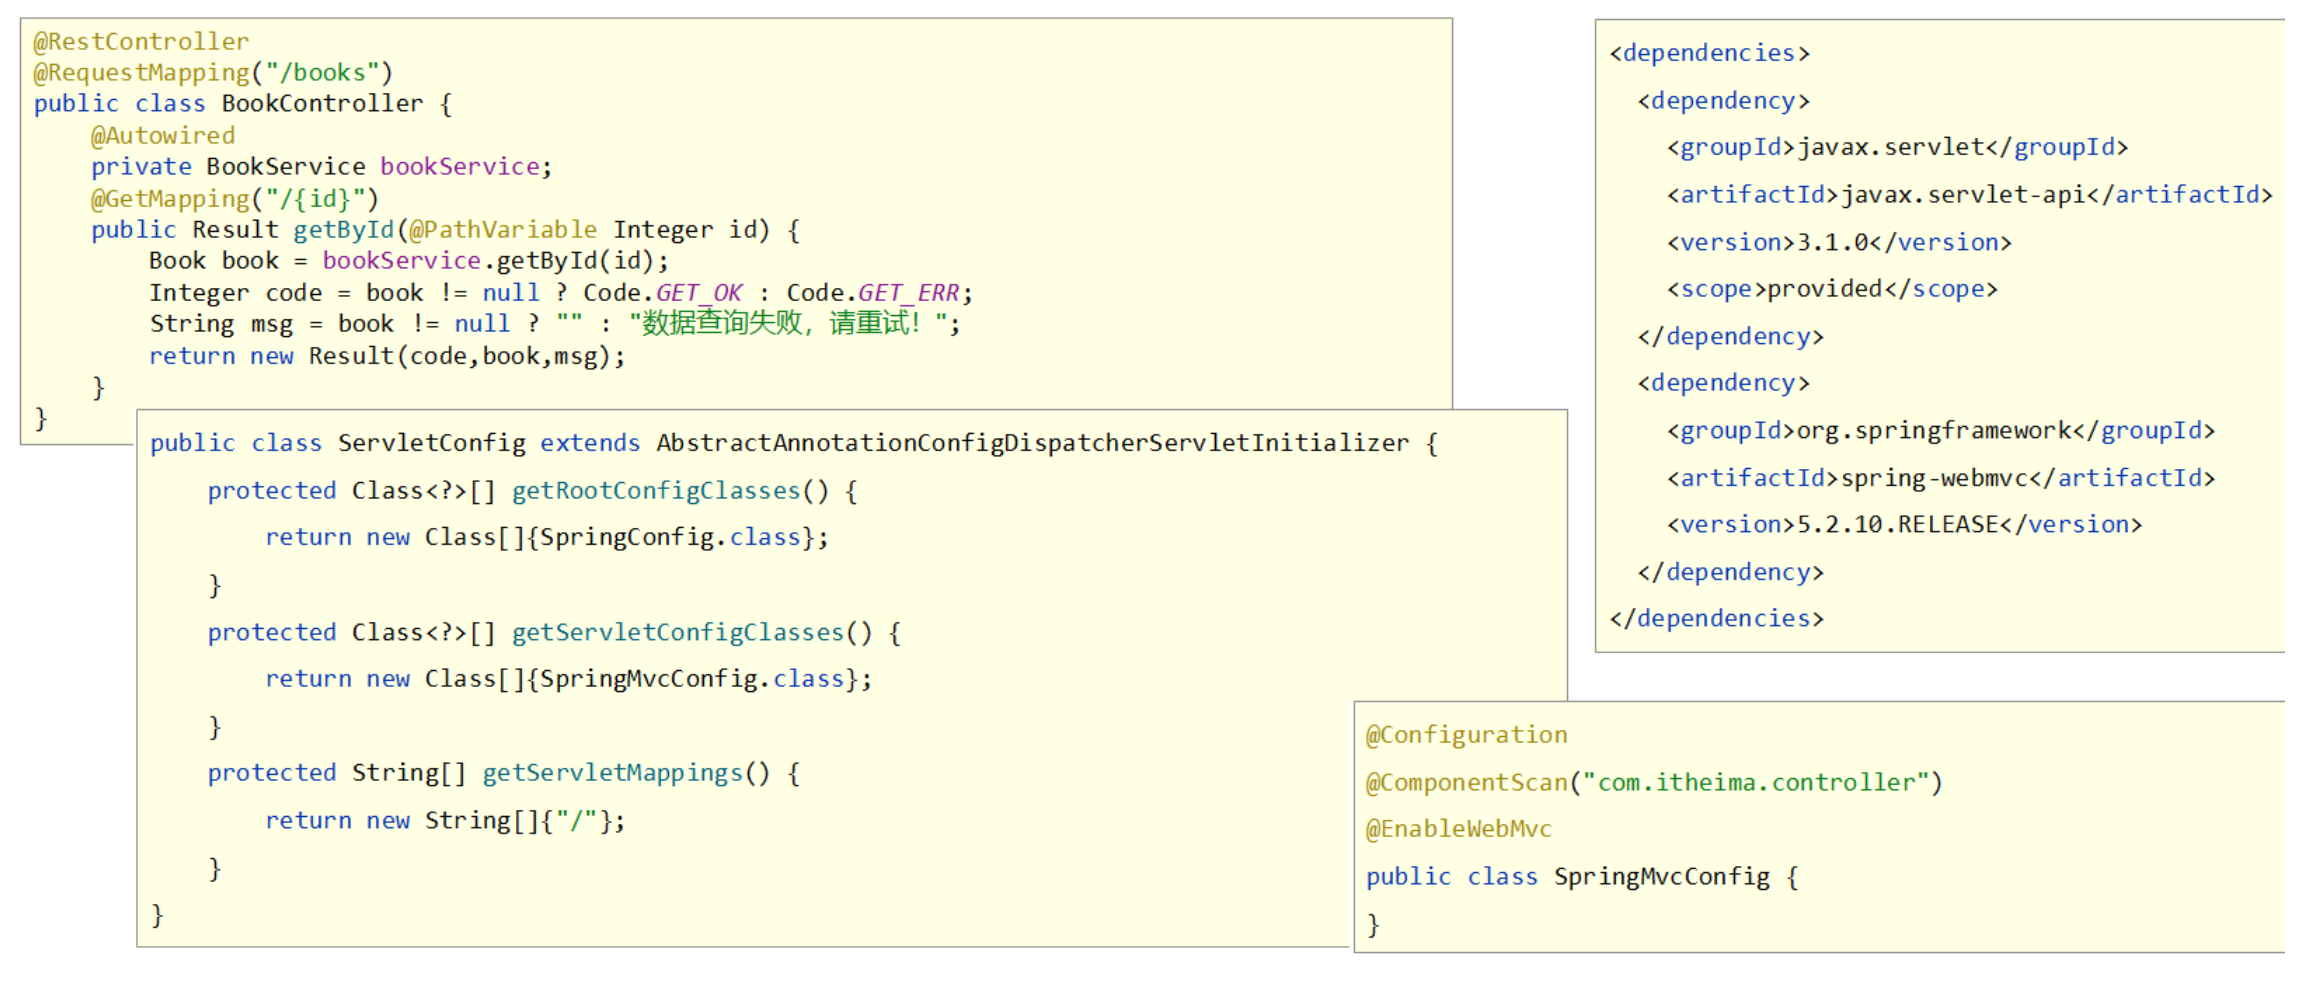
1.1 入门案例开发步骤
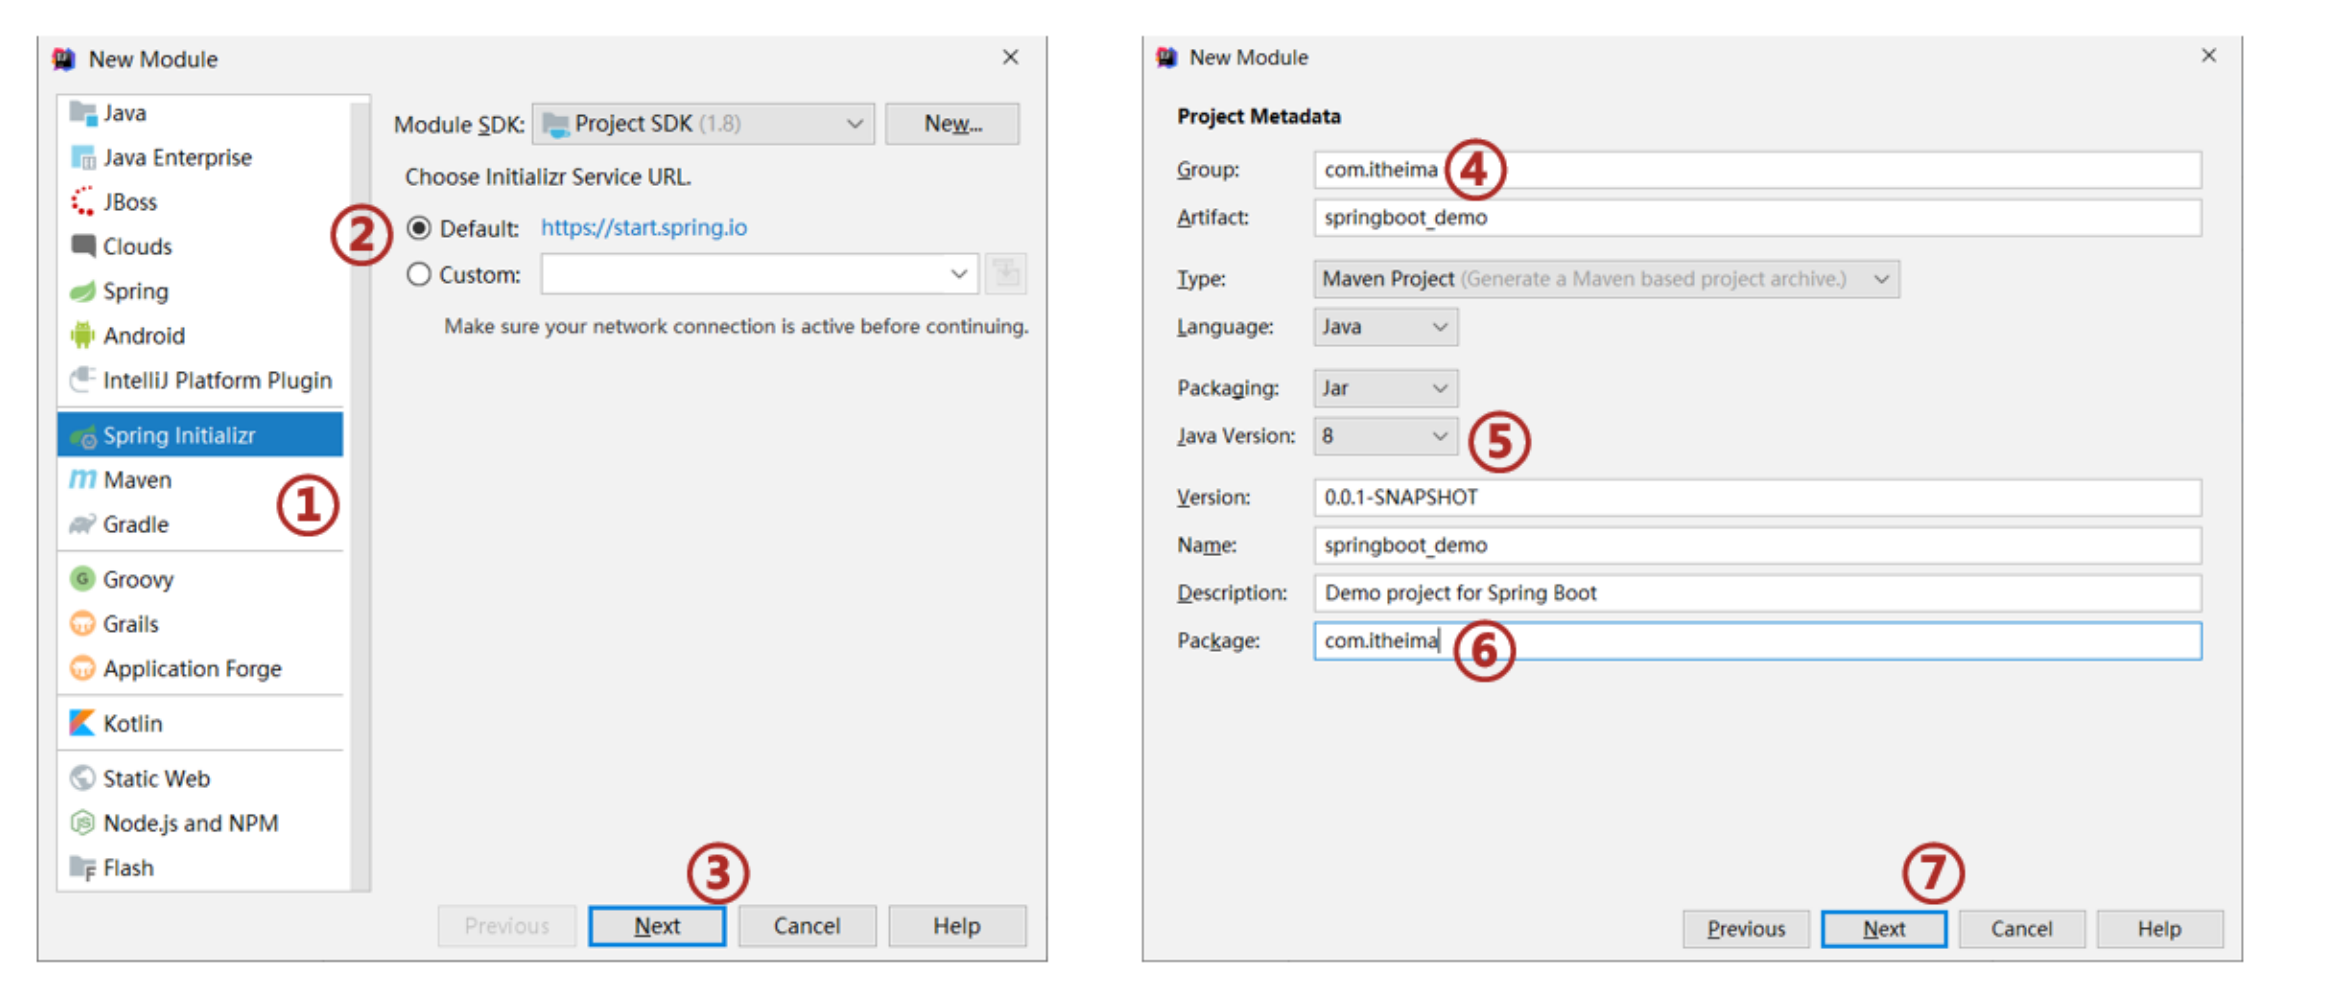
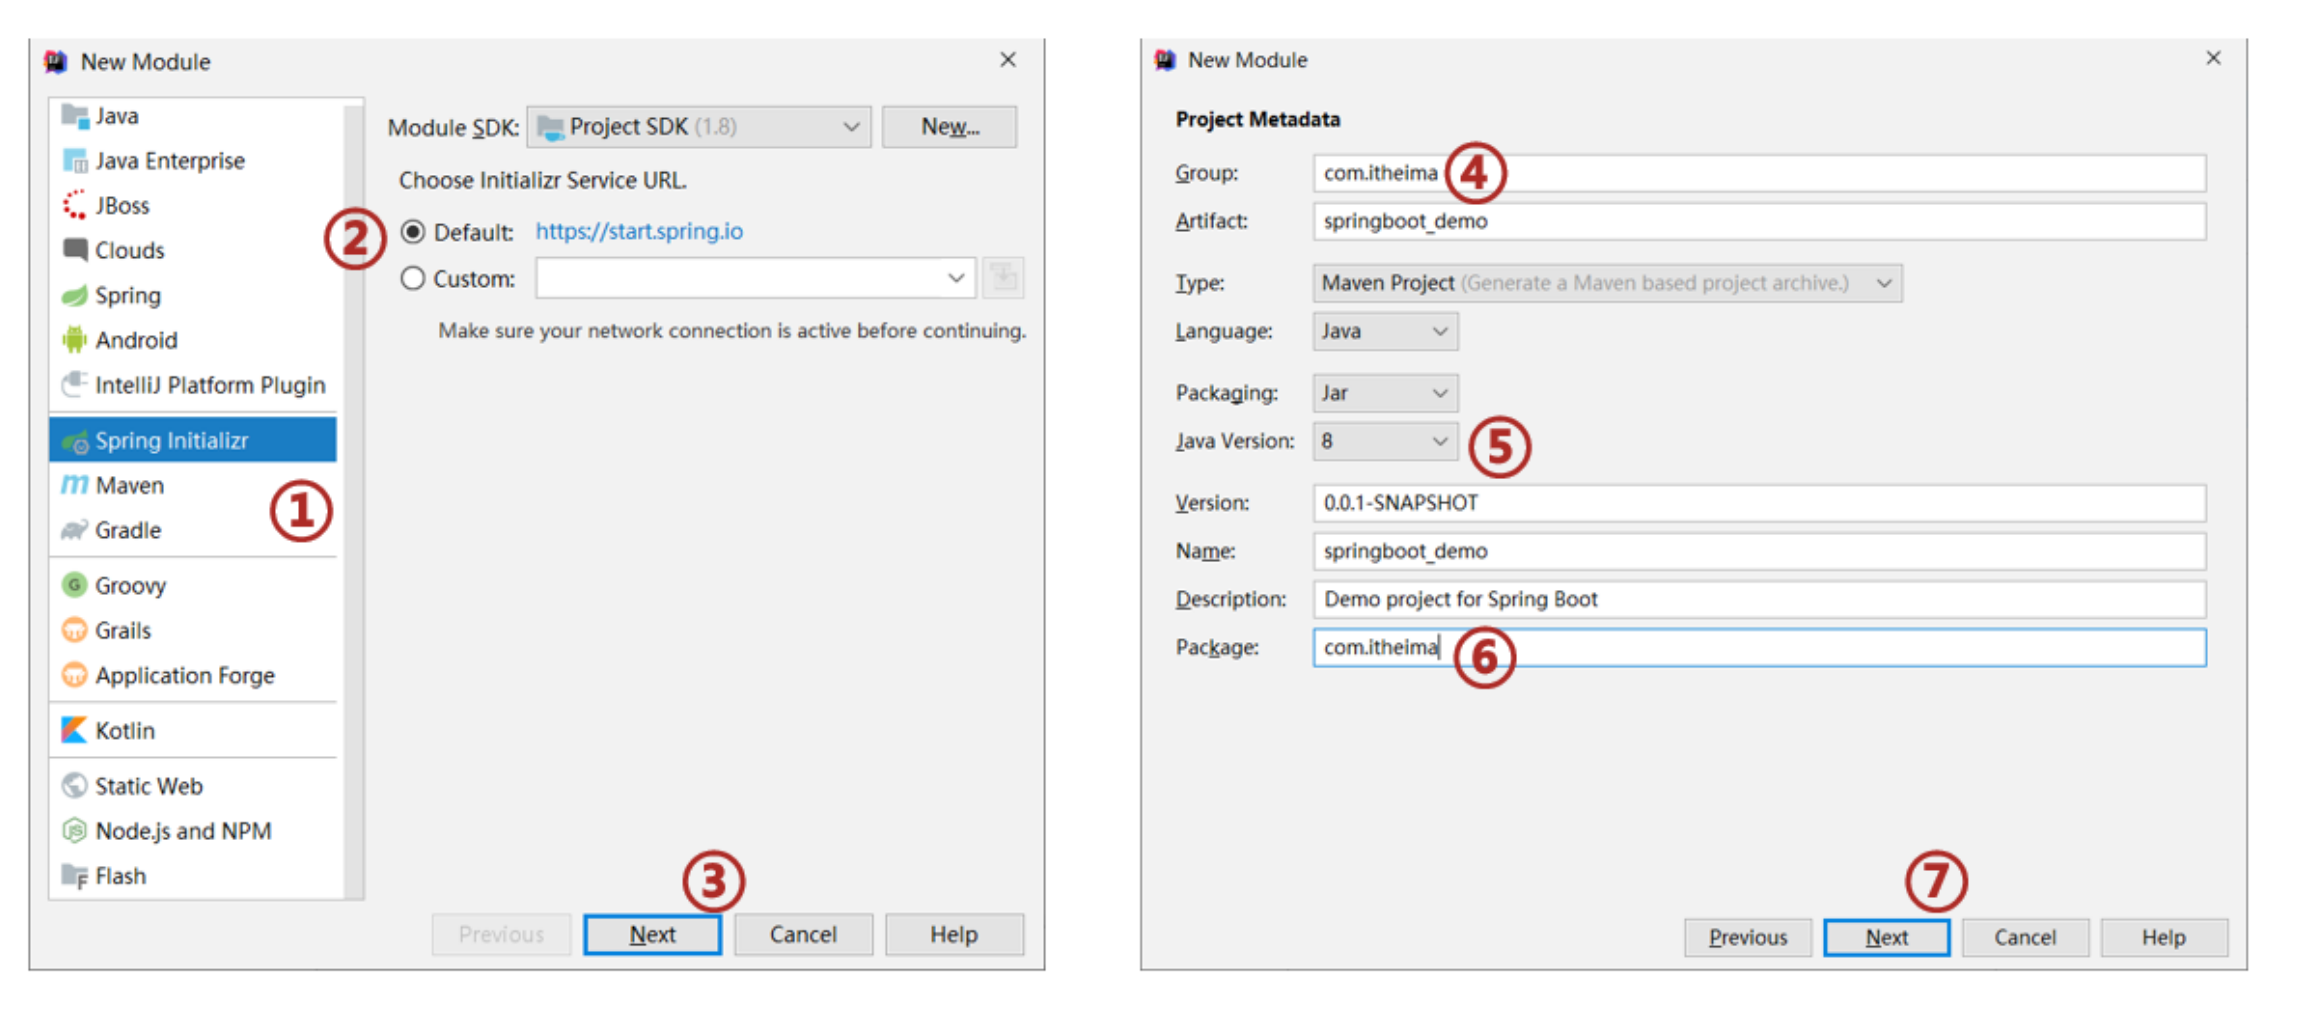
①:创建新模块,选择Spring初始化,并配置模块相关基础信息
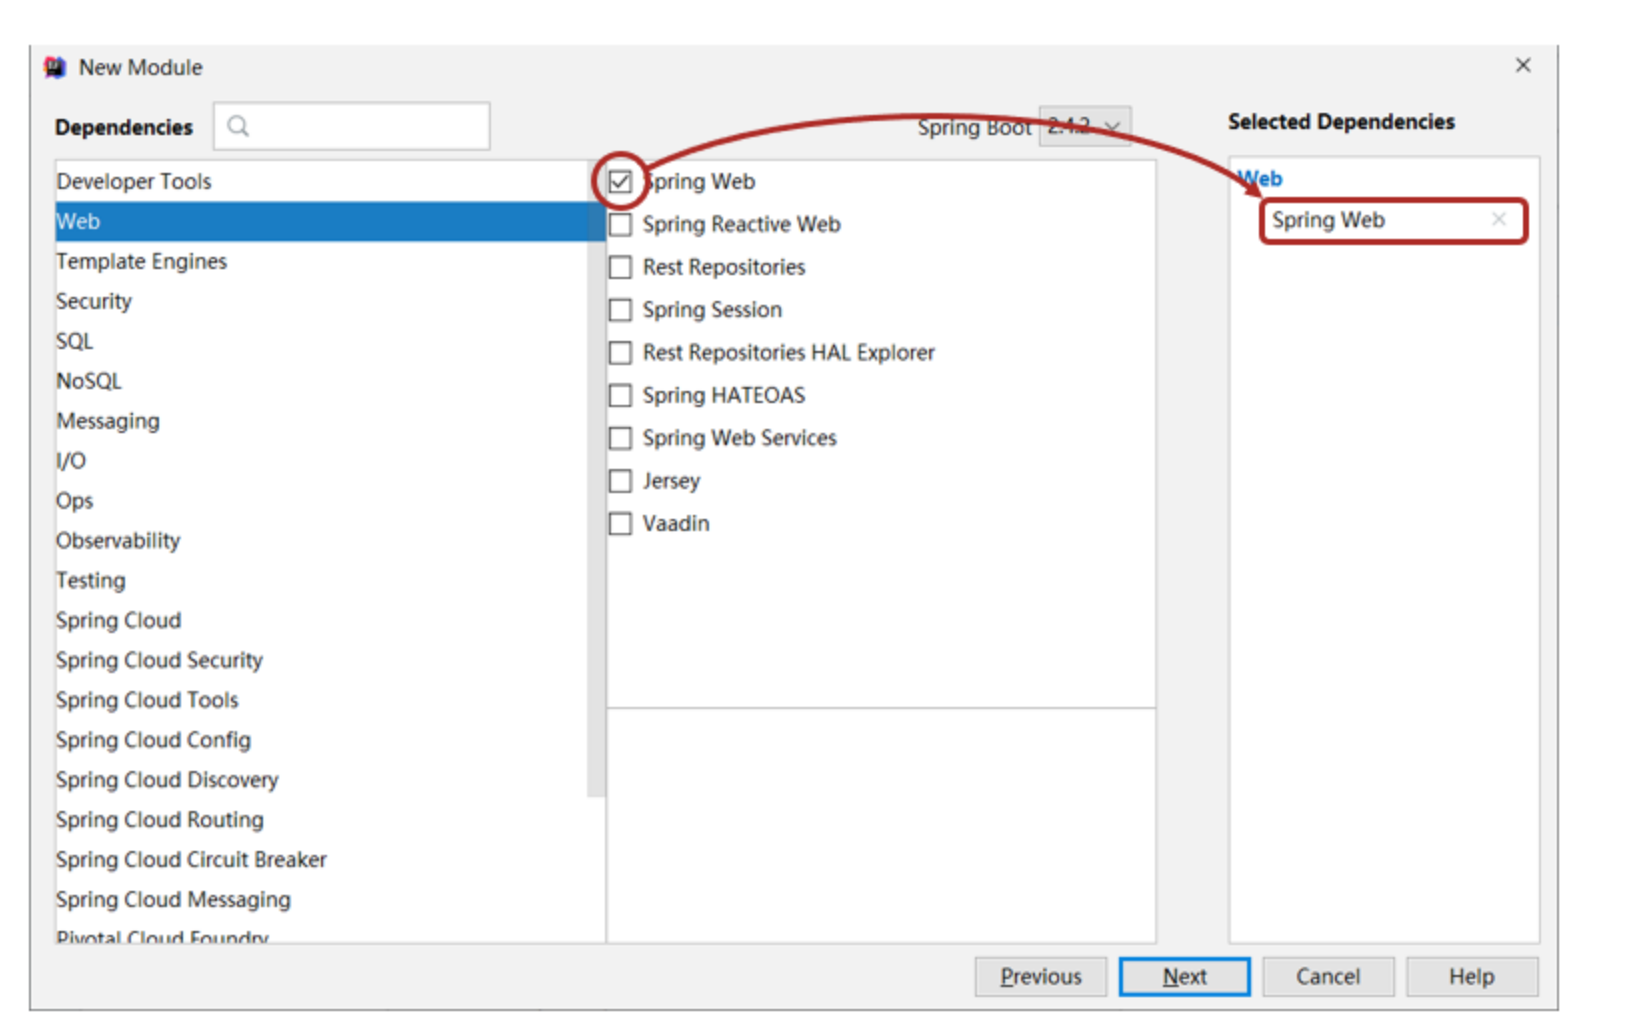
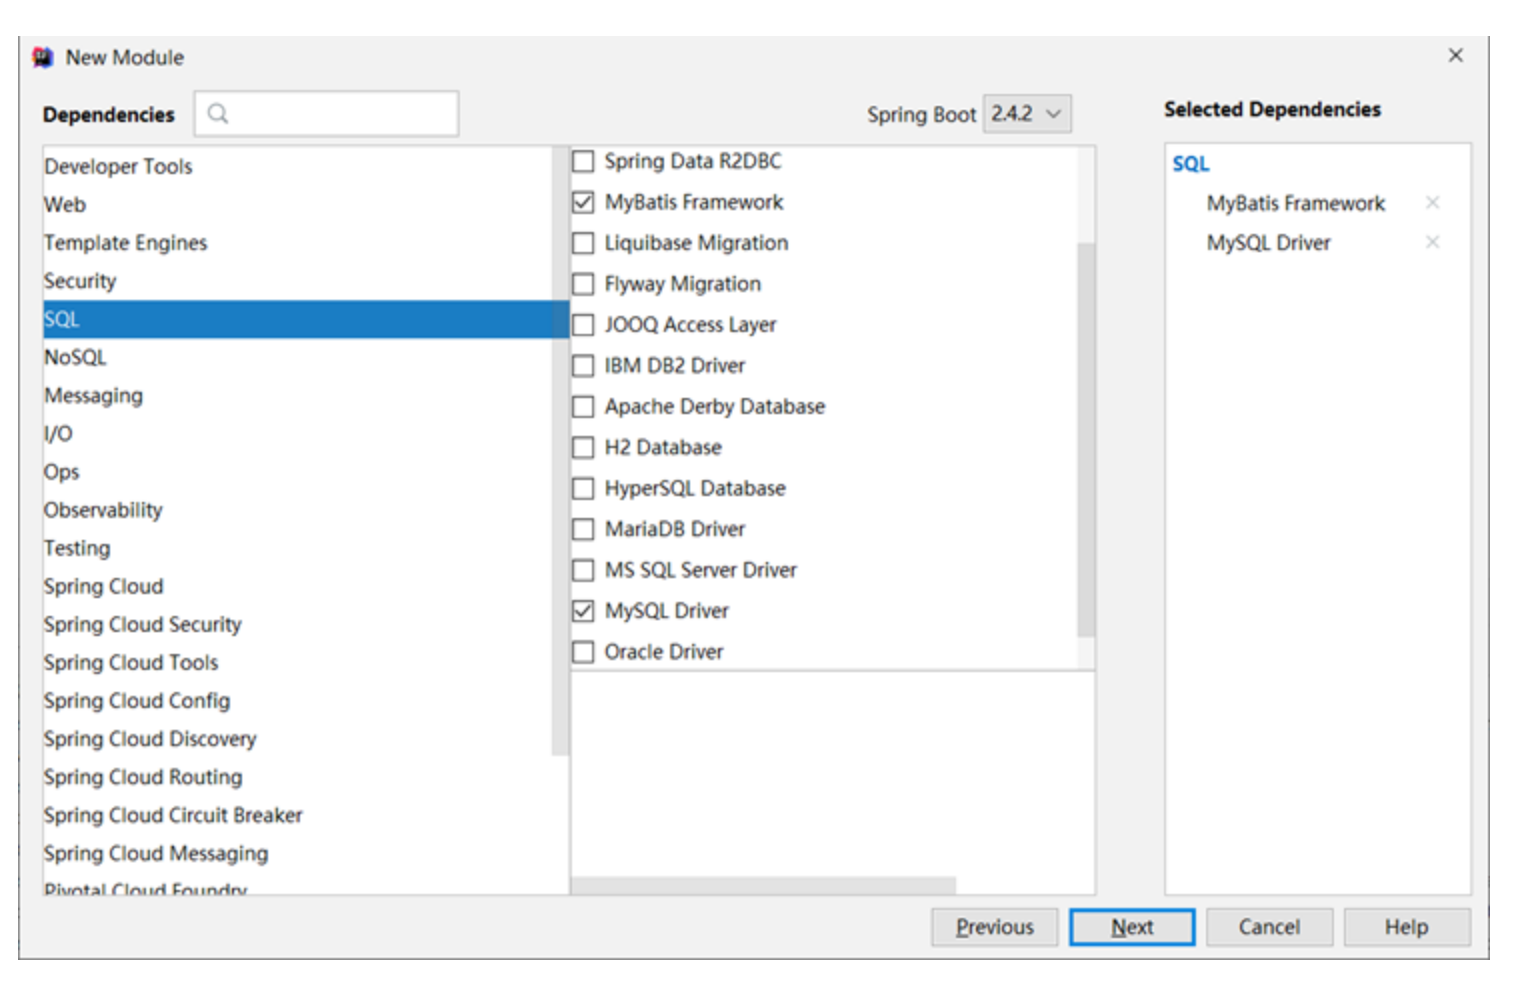
②:选择当前模块需要使用的技术集
③:开发控制器类
@RestController
@RequestMapping("/books")
public class BookController {@GetMapping("/{id}")public String getById(@PathVariable Integer id) {System.out.println("id ==> " + id);return "hello , spring boot! ";}
}
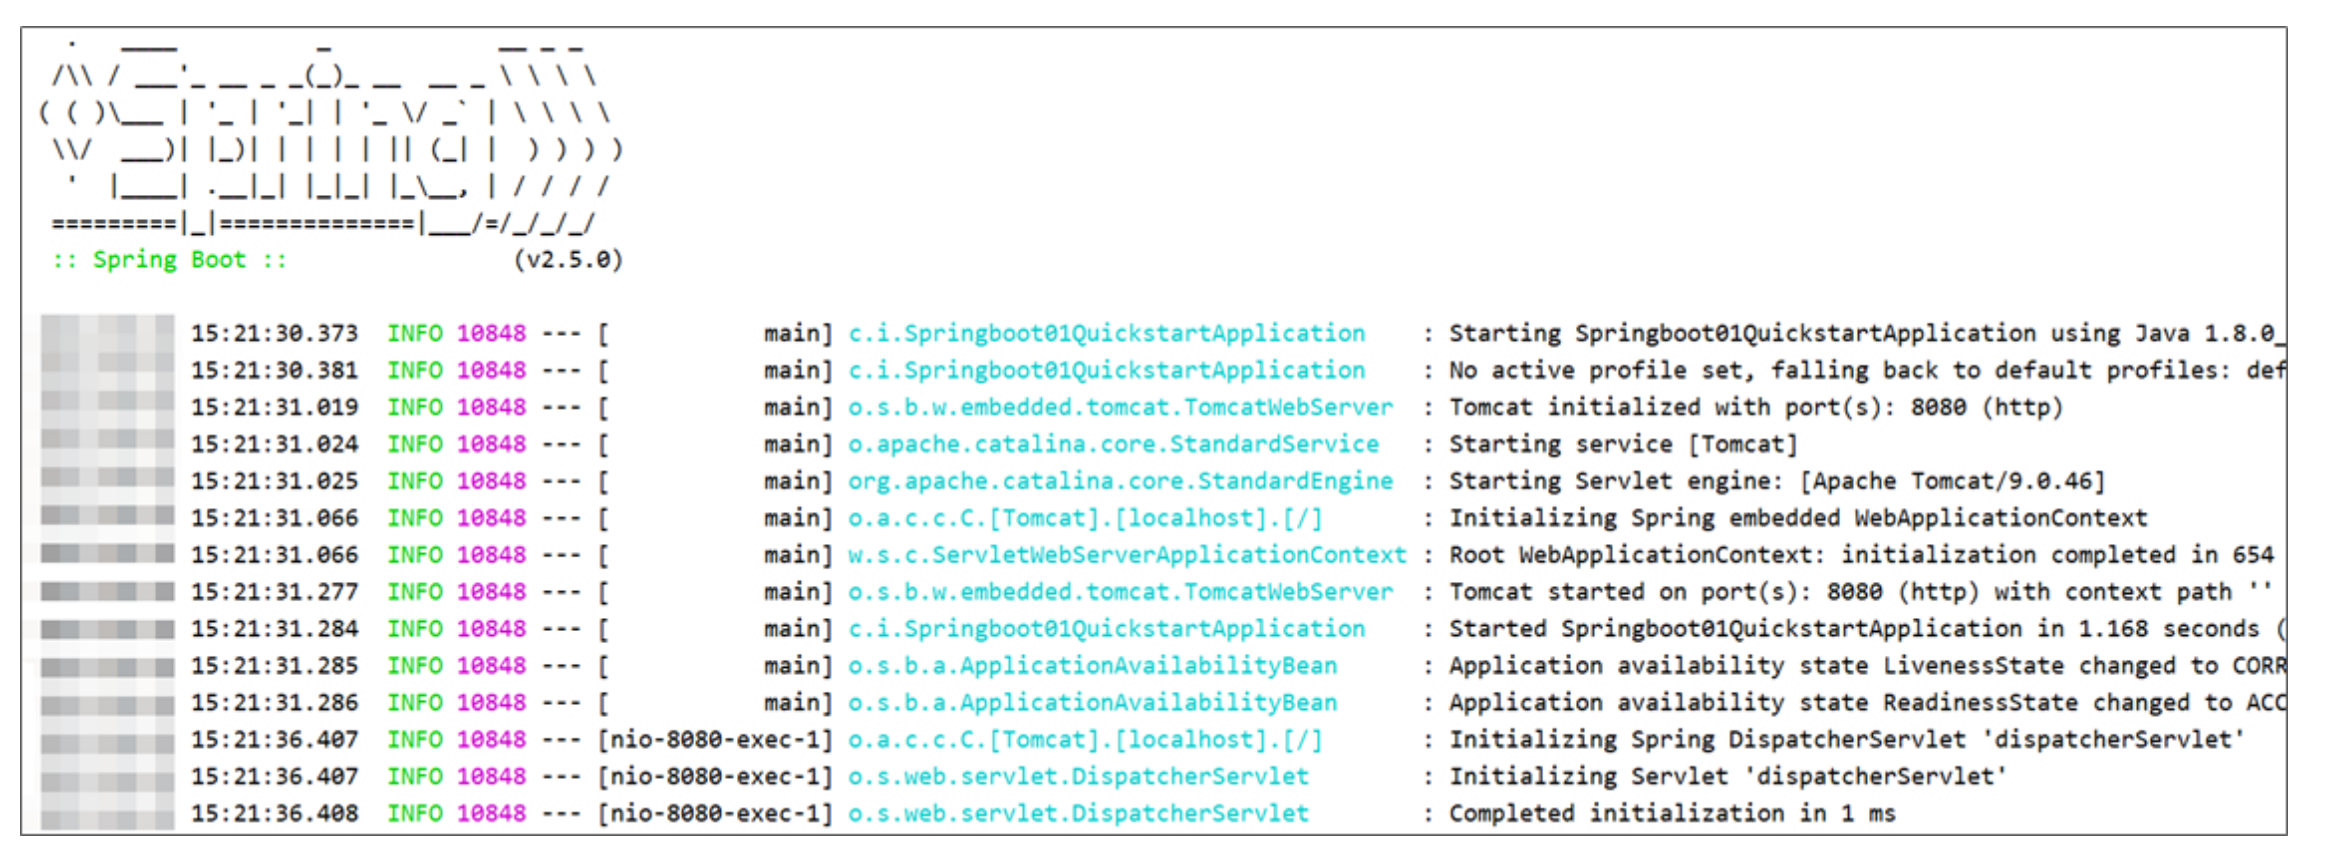
④:运行自动生成的Application类
- 最简SpringBoot程序所包含的基础文件
4.0.0 org.springframework.boot spring-boot-starter-parent 2.5.0 com.itheima springboot-01-quickstart 0.0.1-SNAPSHOT org.springframework.boot spring-boot-starter-web @SpringBootApplication
public class Application {public static void main(String[] args) {SpringApplication.run(Application.class, args);}
}
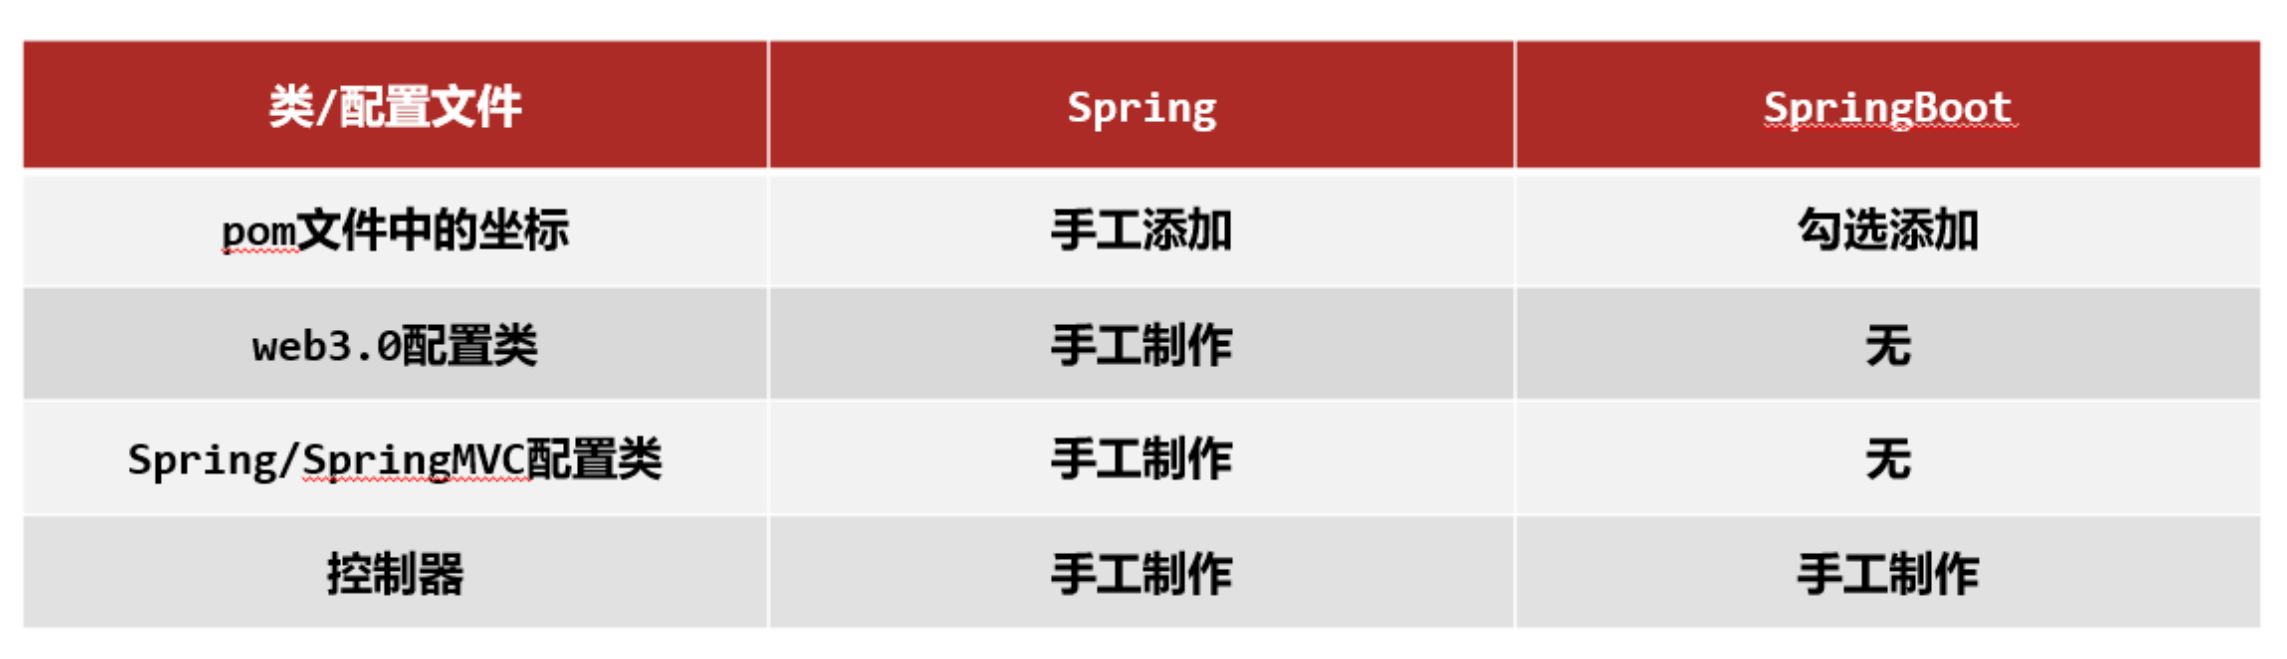
- Spring程序与SpringBoot程序对比
注意事项:
基于idea开发SpringBoot程序需要确保联网且能够加载到程序框架结构
1.2 基于SpringBoot官网创建项目

1.3 SpringBoot项目快速启动
① 对SpringBoot项目打包(执行Maven构建指令package)
② 执行启动指令
java -jar springboot_01_quickstart.jar # 项目的名称根据实际情况修改
注意事项:
jar支持命令行启动需要依赖maven插件支持,请确认打包时是否具有SpringBoot对应的maven插件。
org.springframework.boot spring-boot-maven-plugin 2. SpringBoot概述
问题导入
学习了SpringBoot入门案例之后,感觉对比SpringMVC哪一个更加方便简洁?
- SpringBoot是由Pivotal团队提供的全新框架,其设计目的是用来简化Spring应用的初始搭建以及开发过程
- Spring程序缺点
- 配置繁琐
- 依赖设置繁琐
- SpringBoot程序优点
- 自动配置
- 起步依赖(简化依赖配置)
- 辅助功能(内置服务器,……)
2.1 起步依赖
- starter
- SpringBoot中常见项目名称,定义了当前项目使用的所有项目坐标,以达到减少依赖配置的目的
4.0.0 org.springframework.boot spring-boot-starter-parent 2.5.0 com.itheima springboot-01-quickstart 0.0.1-SNAPSHOT org.springframework.boot spring-boot-starter-web 4.0.0 org.springframework.boot spring-boot-dependencies 2.5.0 pom 4.0.1 ...- parent
- 所有SpringBoot项目要继承的项目,定义了若干个坐标版本号(依赖管理,而非依赖),以达到减少依赖冲突的目的
- spring-boot-starter-parent(2.5.0)与 spring-boot-starter-parent(2.4.6)共计57处坐标版本不同
4.0.0 org.springframework.boot spring-boot-dependencies 2.5.0 spring-boot-starter-parent pom ...
- 实际开发
- 使用任意坐标时,仅书写GAV中的G和A,V由SpringBoot提供
- 如发生坐标错误,再指定version(要小心版本冲突)
junit junit ${junit.version}
javax.servlet javax.servlet-api ${servlet-api.version}
org.springframework.boot spring-boot-starter-parent 2.5.0 org.springframework.boot spring-boot-starter-web org.springframework.boot spring-boot-starter-test test 2.2 辅助功能
- SpringBoot程序启动
@SpringBootApplication
public class Springboot01QuickstartApplication {public static void main(String[] args) {SpringApplication.run(Springboot01QuickstartApplication.class, args);}
}
- SpringBoot在创建项目时,采用jar的打包方式
- SpringBoot的引导类是项目的入口,运行main方法就可以启动项目
- 使用maven依赖管理变更起步依赖项
- Jetty比Tomcat更轻量级,可扩展性更强(相较于Tomcat),谷歌应用引擎(GAE)已经全面切换为Jetty
org.springframework.boot spring-boot-starter-web org.springframework.boot spring-boot-starter-tomcat org.springframework.boot spring-boot-starter-jetty 二、基础配置
1. 配置文件格式
问题导入
框架常见的配置文件有哪几种形式?
1.1 修改服务器端口
http://localhost:8080/books/1 >>> http://localhost/books/1
SpringBoot提供了多种属性配置方式
- application.properties
server.port=80
- application.yml
server:port: 81
- application.yaml
server:port: 82
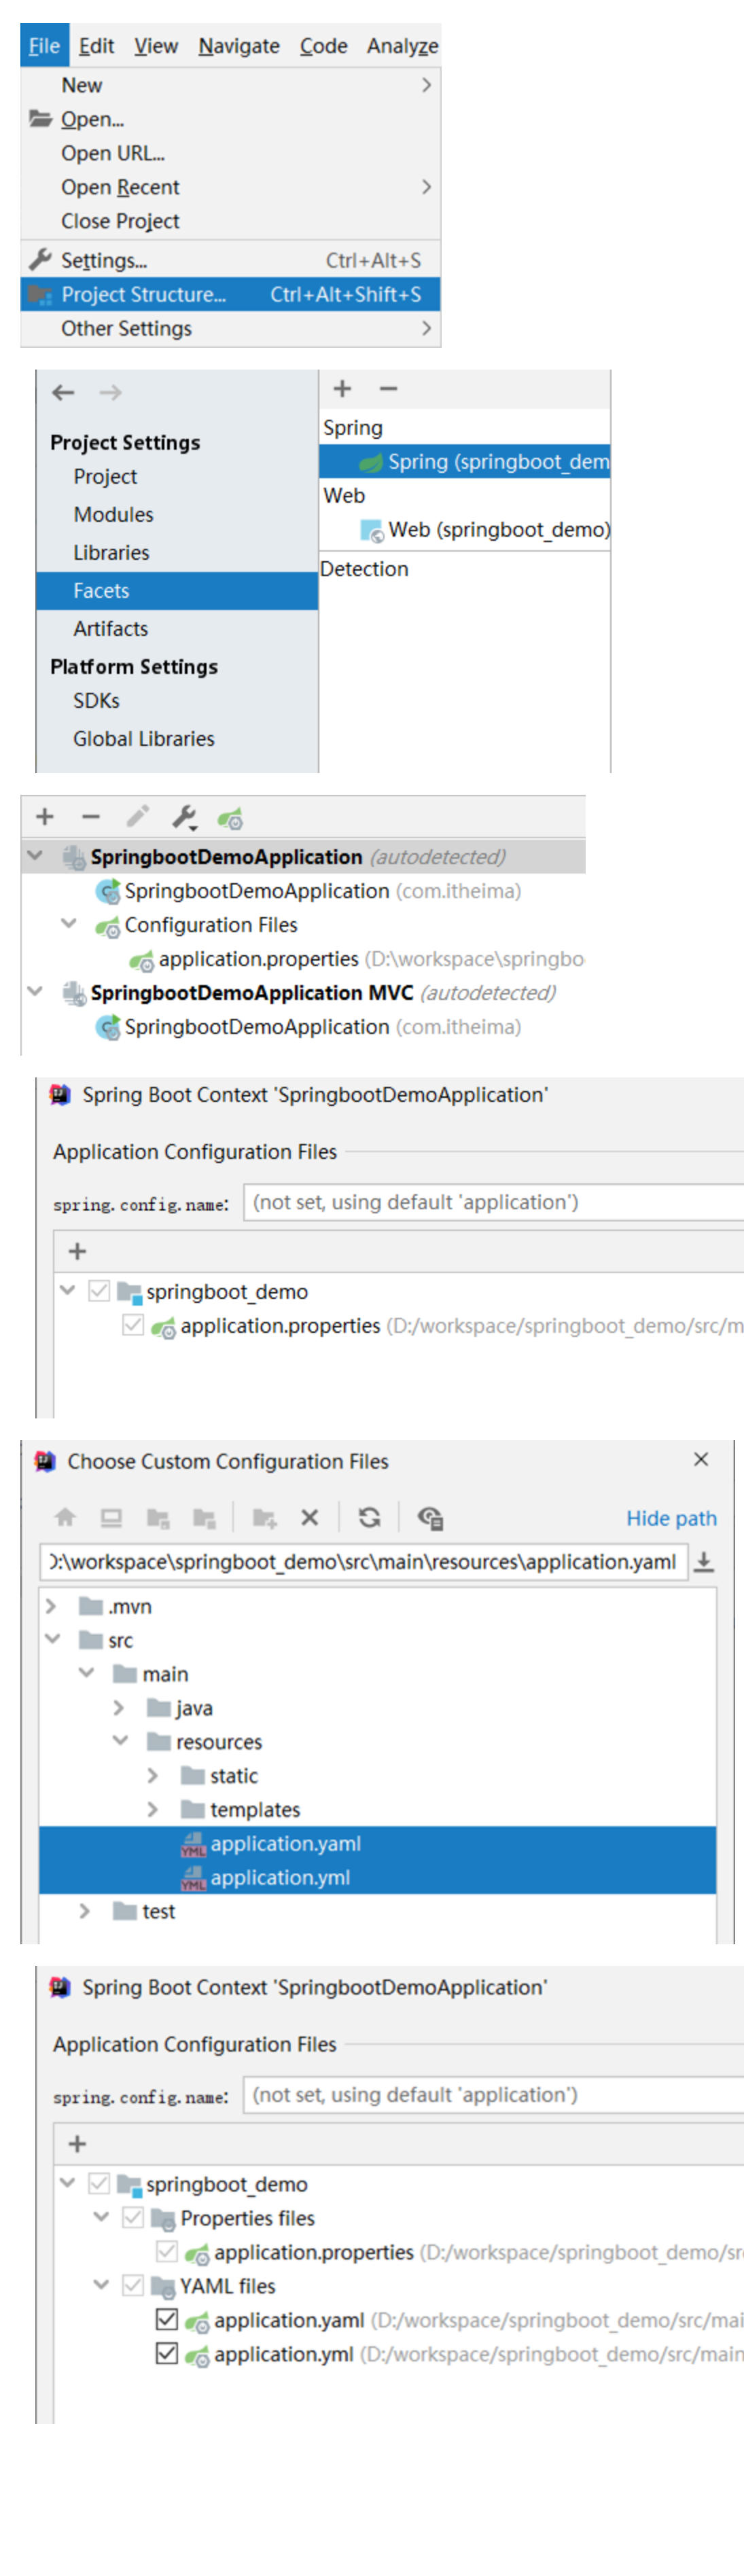
1.2 自动提示功能消失解决方案
操作步骤:
1.3 SpringBoot配置文件加载顺序(了解)
- application.properties > application.yml > application.yaml
注意事项:
- SpringBoot核心配置文件名为application
- SpringBoot内置属性过多,且所有属性集中在一起修改,在使用时,通过提示键+关键字修改属性
2. yaml
问题导入
什么是yaml,和properties有什么区别?
- YAML(YAML Ain’t Markup Language),一种数据序列化格式
- 优点:
- 容易阅读
- 容易与脚本语言交互
- 以数据为核心,重数据轻格式
- YAML文件扩展名
- .yml(主流)
- .yaml
2.1 yaml语法规则
- 大小写敏感
- 属性层级关系使用多行描述,每行结尾使用冒号结束
- 使用缩进表示层级关系,同层级左侧对齐,只允许使用空格(不允许使用Tab键)
- 属性值前面添加空格(属性名与属性值之间使用冒号+空格作为分隔)
- #表示注释
- 核心规则:数据前面要加空格与冒号隔开
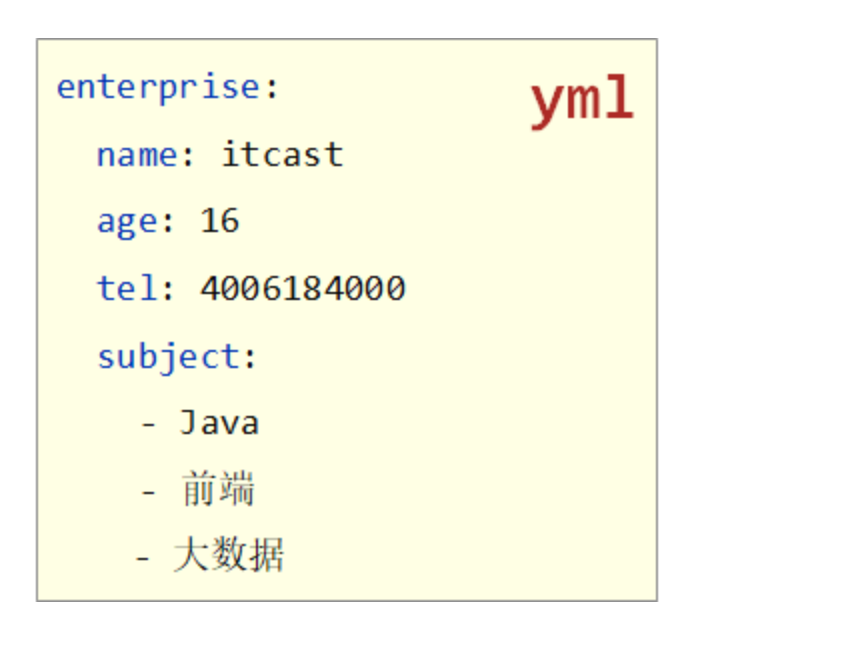
2.2 yaml数组数据
- 数组数据在数据书写位置的下方使用减号作为数据开始符号,每行书写一个数据,减号与数据间空格分隔
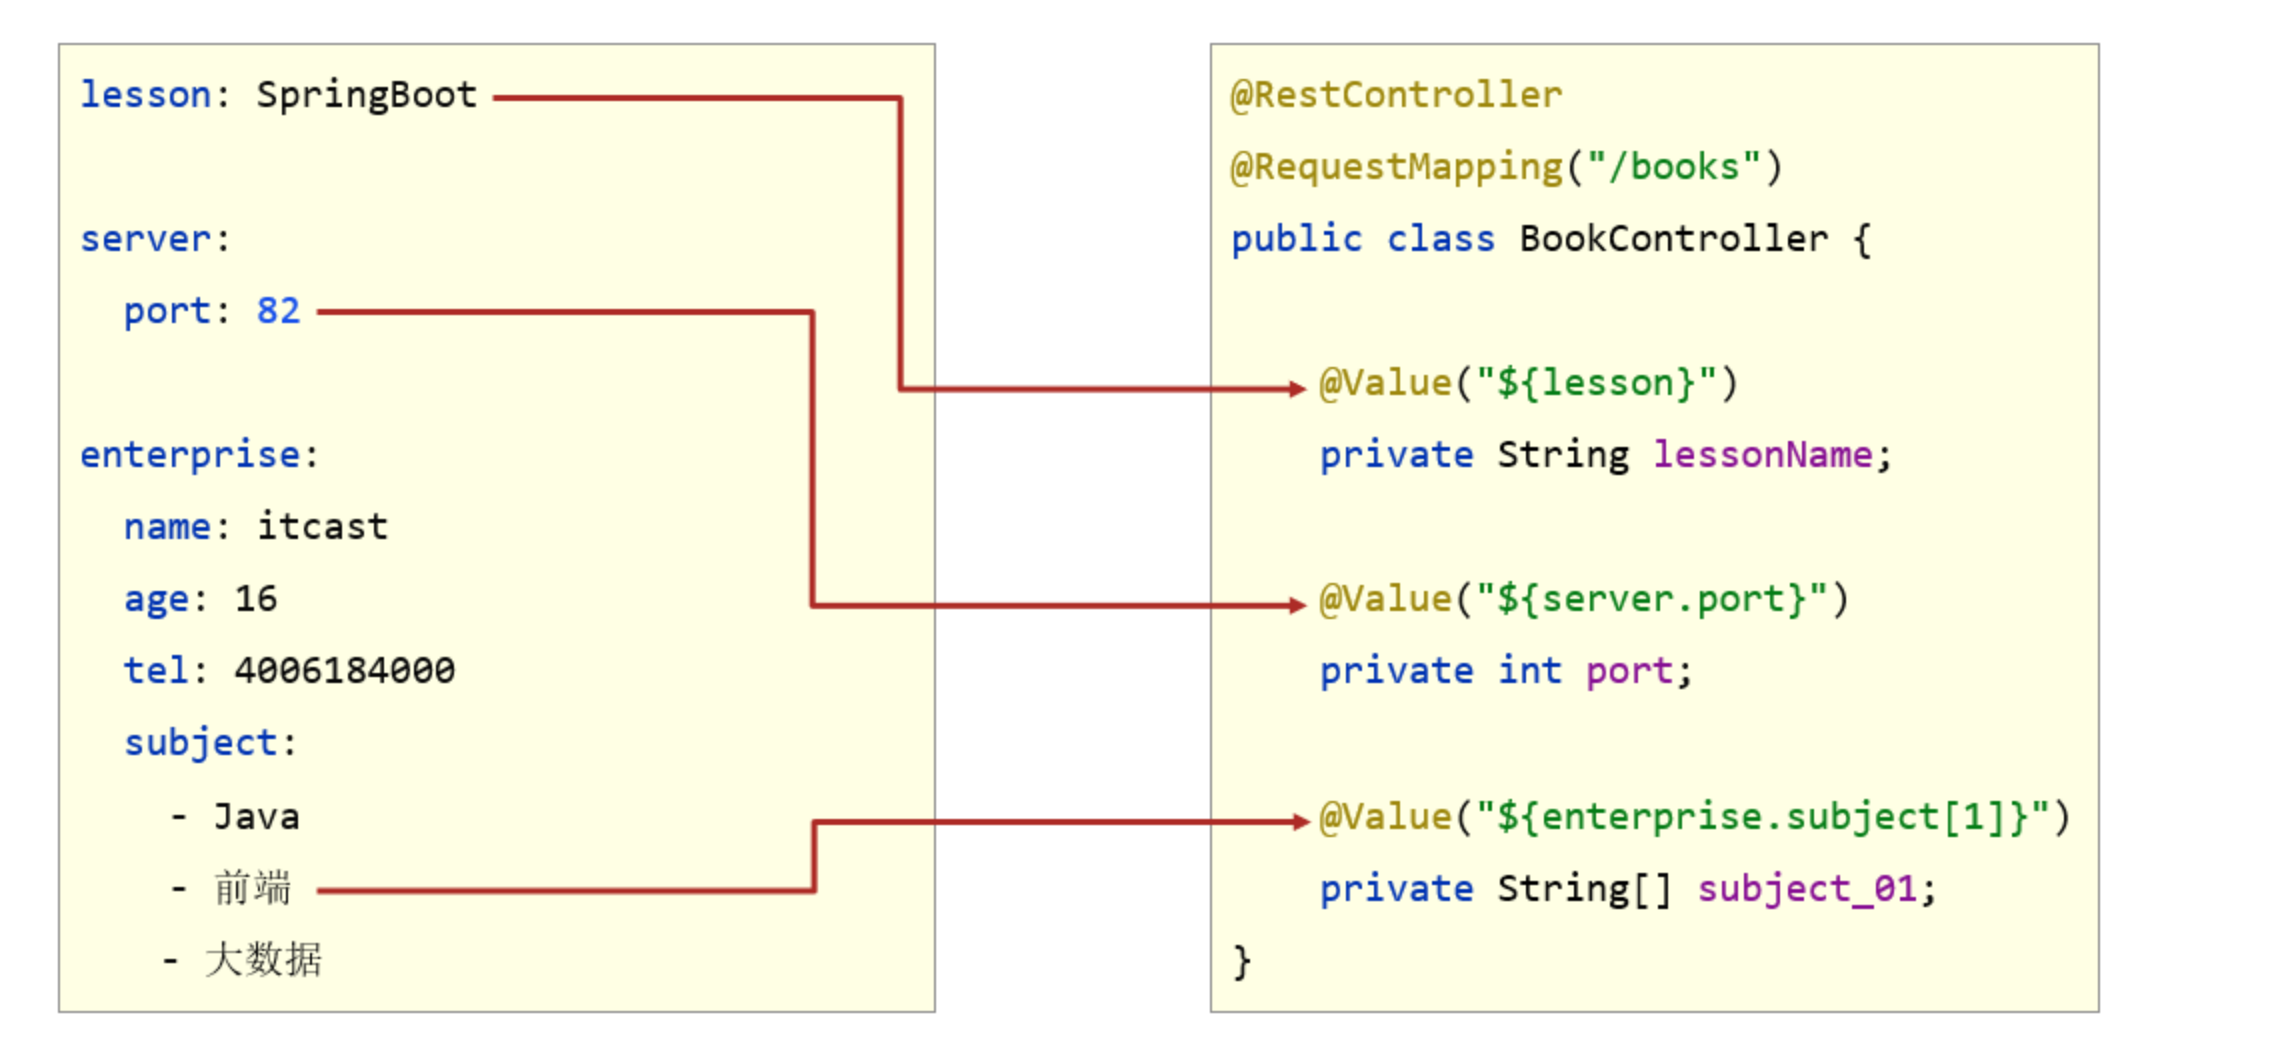
2.3 yaml数据读取
- 使用@Value读取单个数据,属性名引用方式:${一级属性名.二级属性名……}
-
封装全部数据到Environment对象
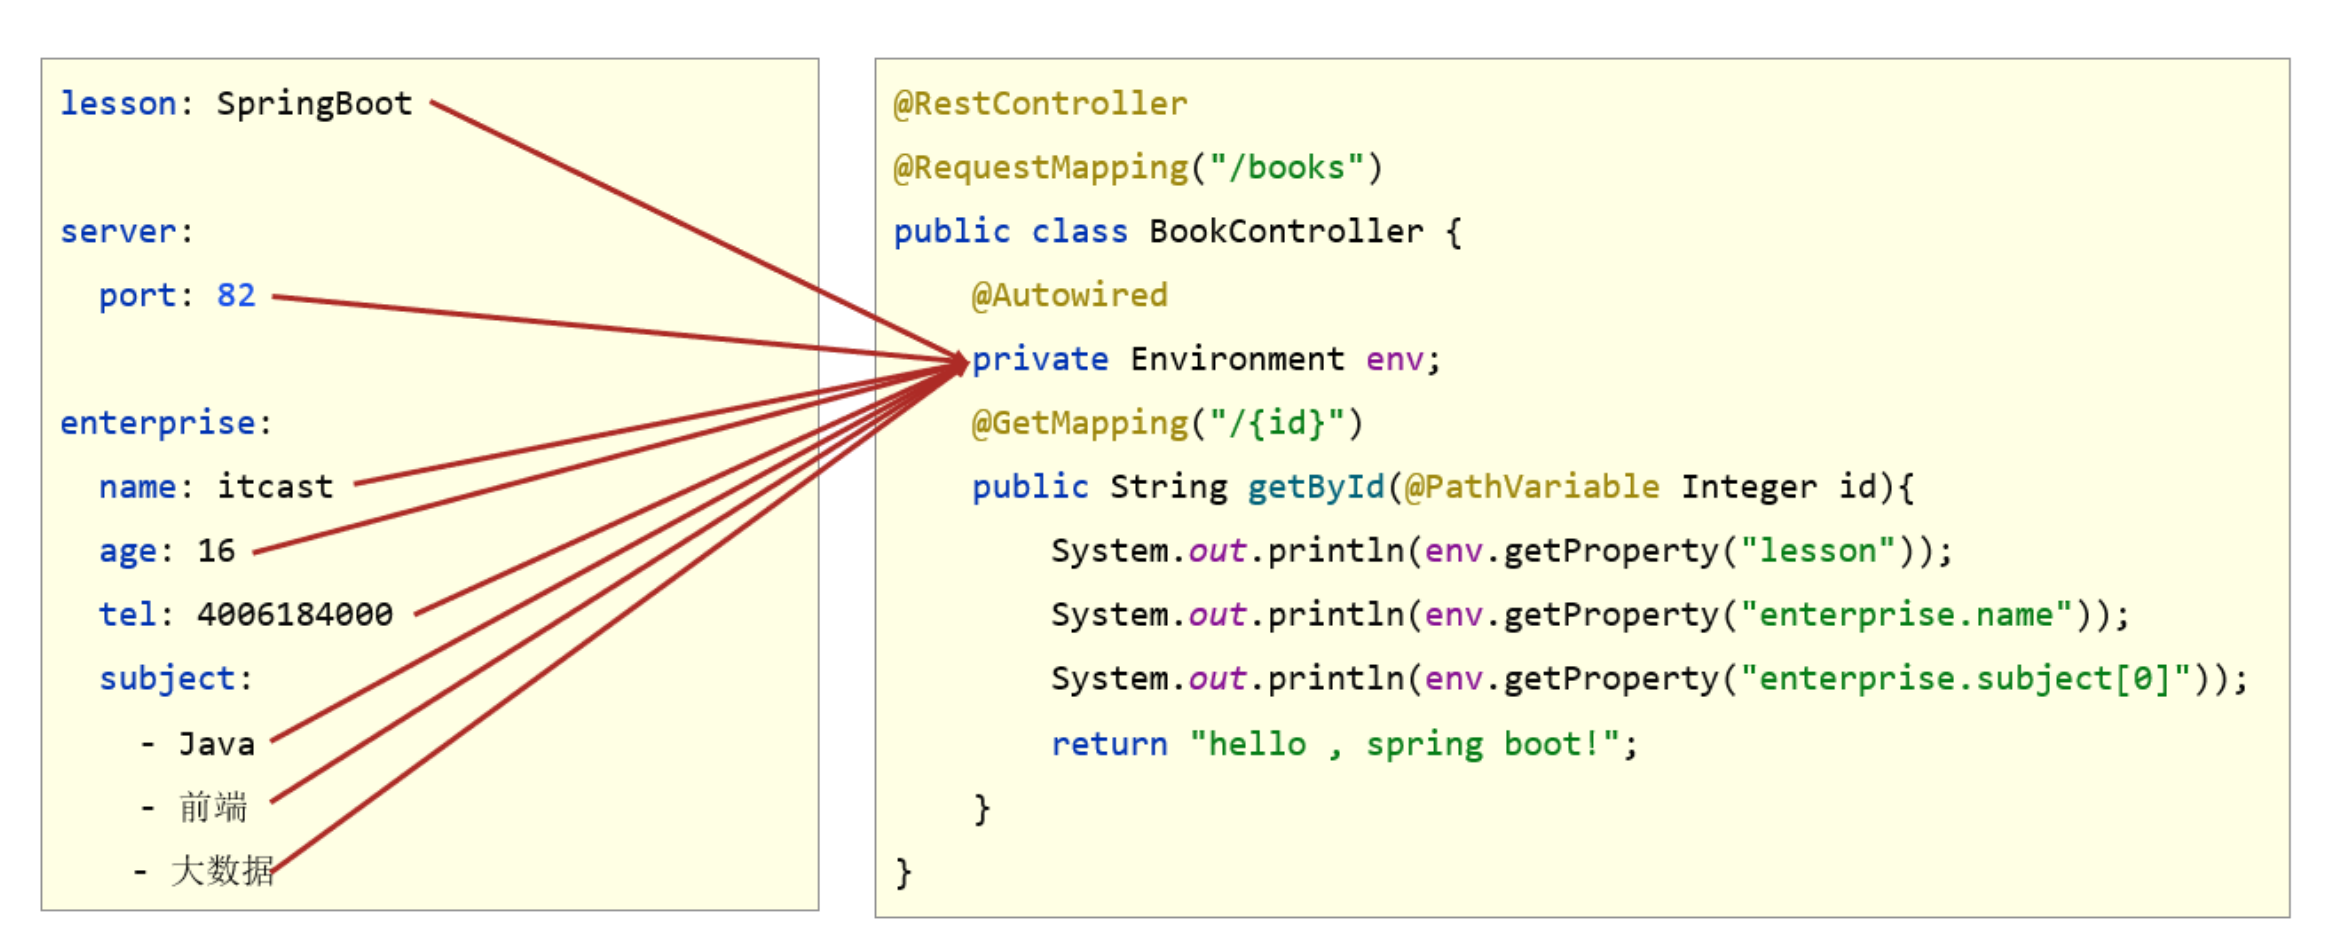
-
自定义对象封装指定数据【常用】
public class Enterprise {private String name;private Integer age;private String tel;private String[] subject;//自行添加getter、setter、toString()等方法
}

- 自定义对象封装数据警告解决方案
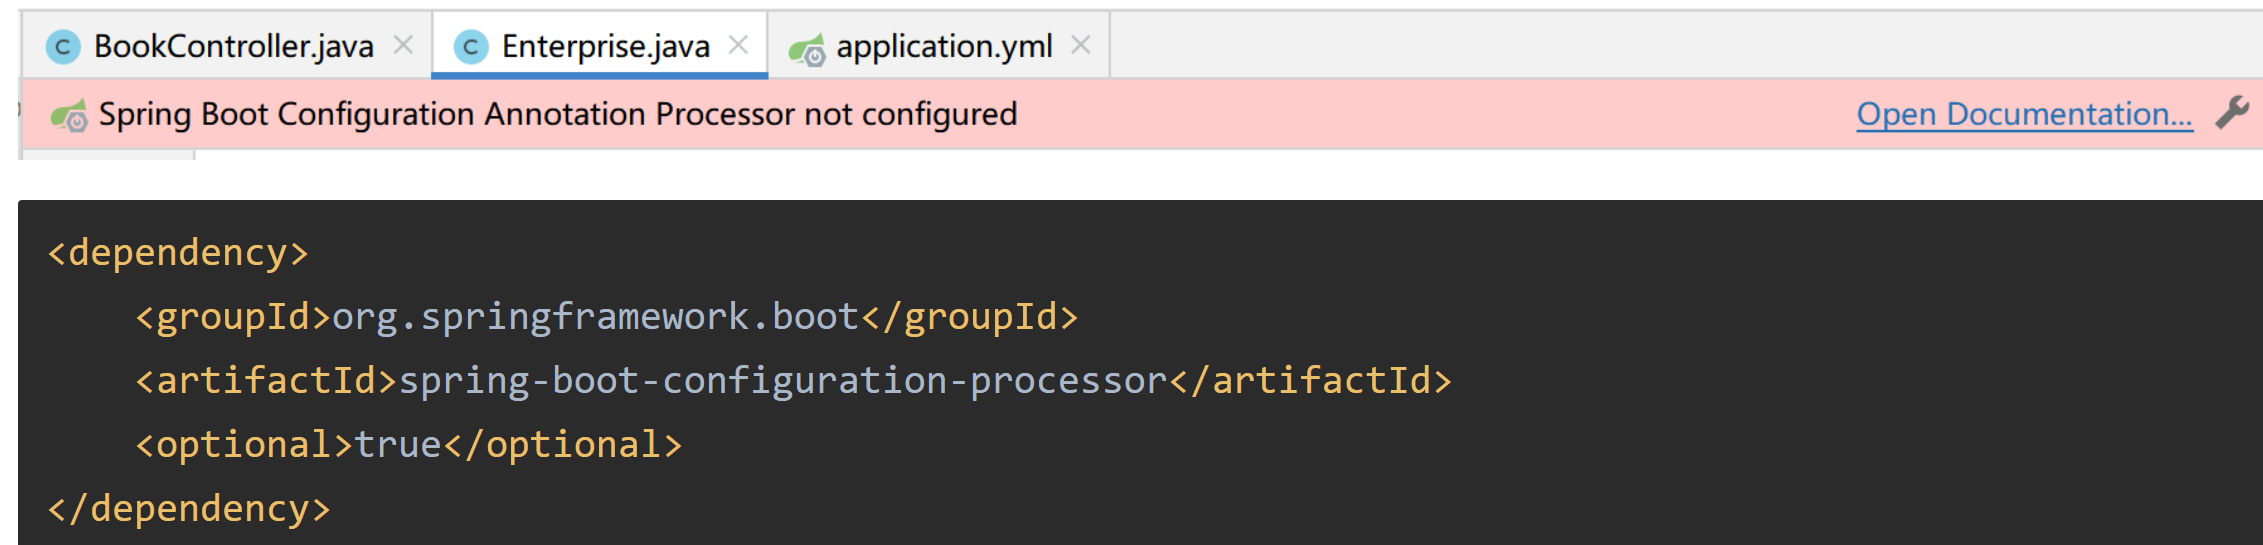
org.springframework.boot spring-boot-configuration-processor true
3. 多环境开发配置
问题导入
在实际开发中,项目的开发环境、测试环境、生产环境的配置信息是否会一致?如何快速切换?
3.1 多环境启动配置
- yaml文件多环境启动

- properties文件多环境启动
#主启动配置文件 application.properties
spring.profiles.active=pro
#环境分类配置文件 application-pro.properties
server.port=80
#环境分类配置文件 application-dev.properties
server.port=81
#环境分类配置文件application-test.properties
server.port=82
3.2 多环境启动命令格式
- 带参数启动SpringBoot
java –jar springboot.jar --spring.profiles.active=test
java –jar springboot.jar --server.port=88
java –jar springboot.jar --server.port=88 --spring.profiles.active=test
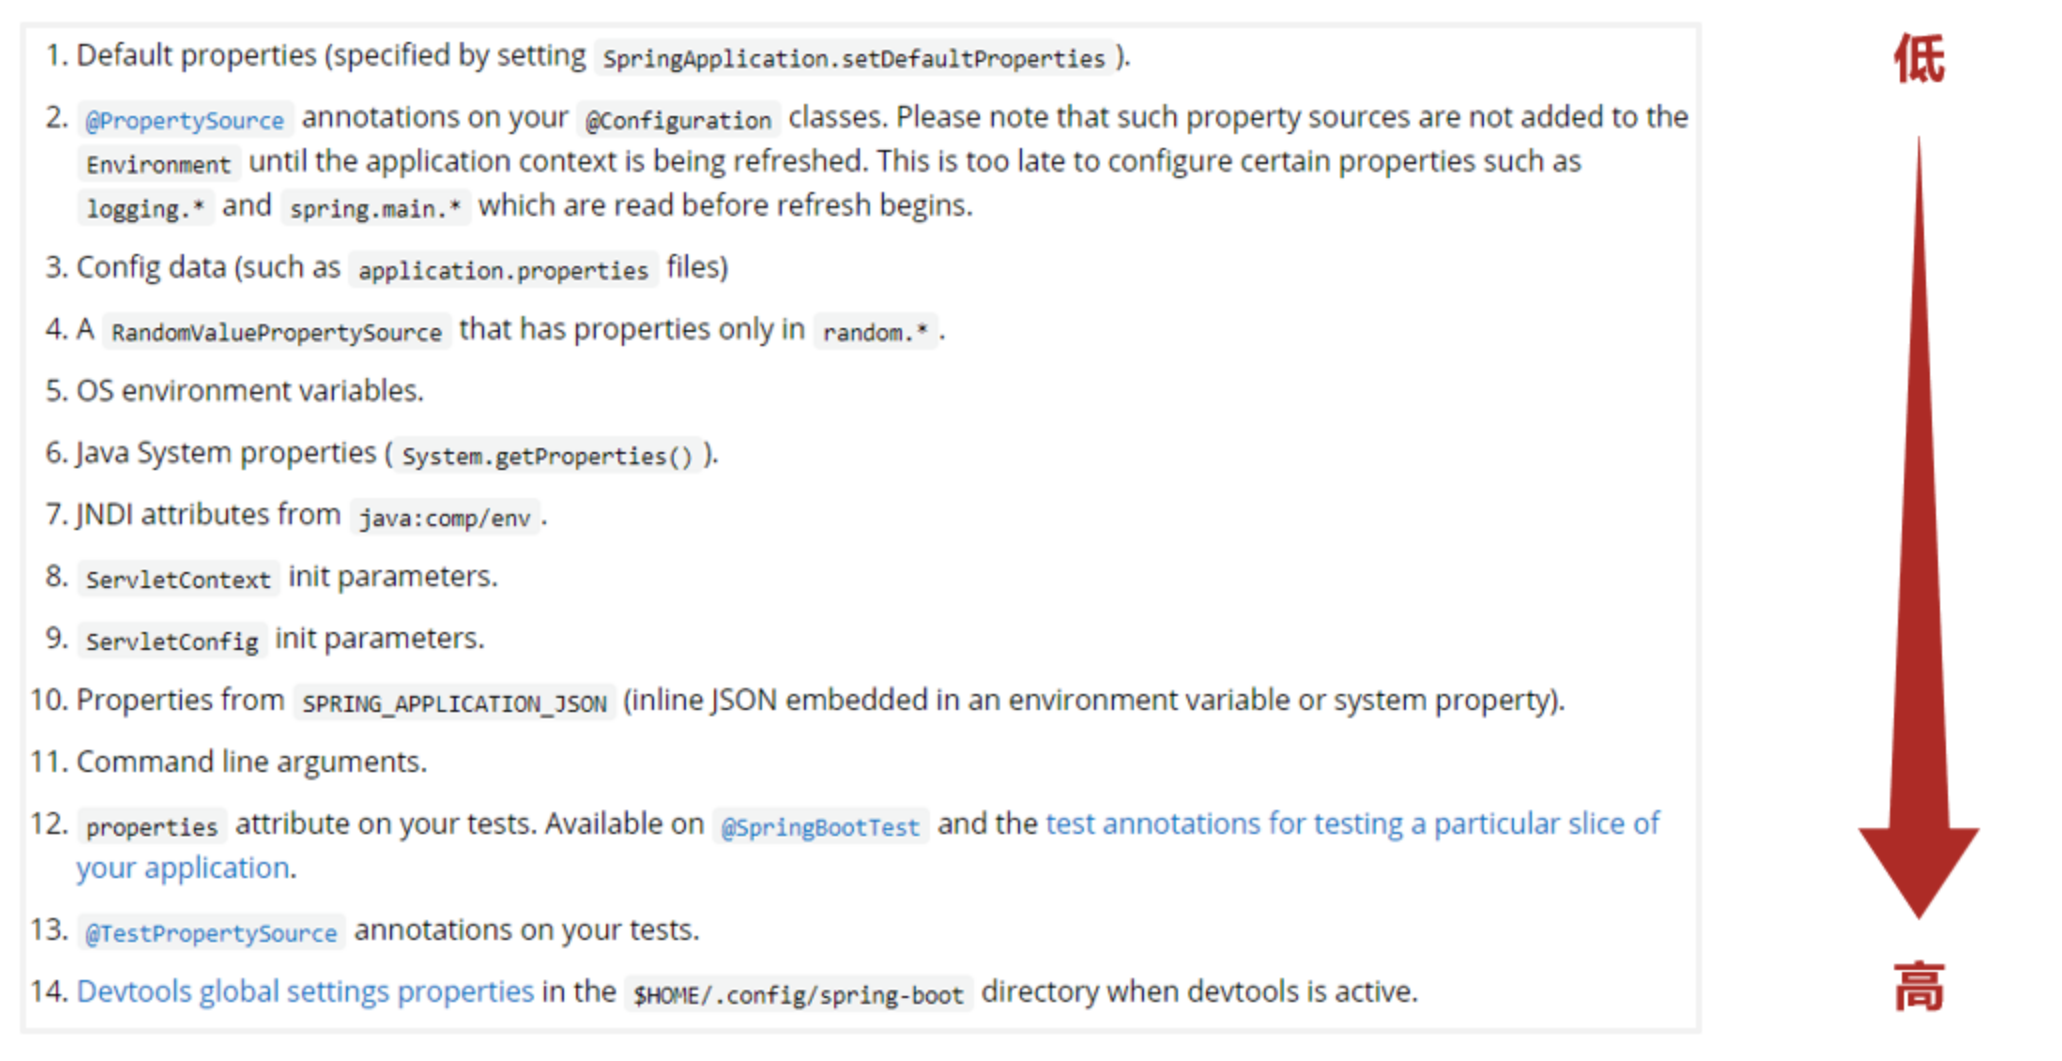
- 参数加载优先顺序
- 参看文档:https://docs.spring.io/spring-boot/docs/current/reference/html/spring-boot-features.html#boot-features-external-config
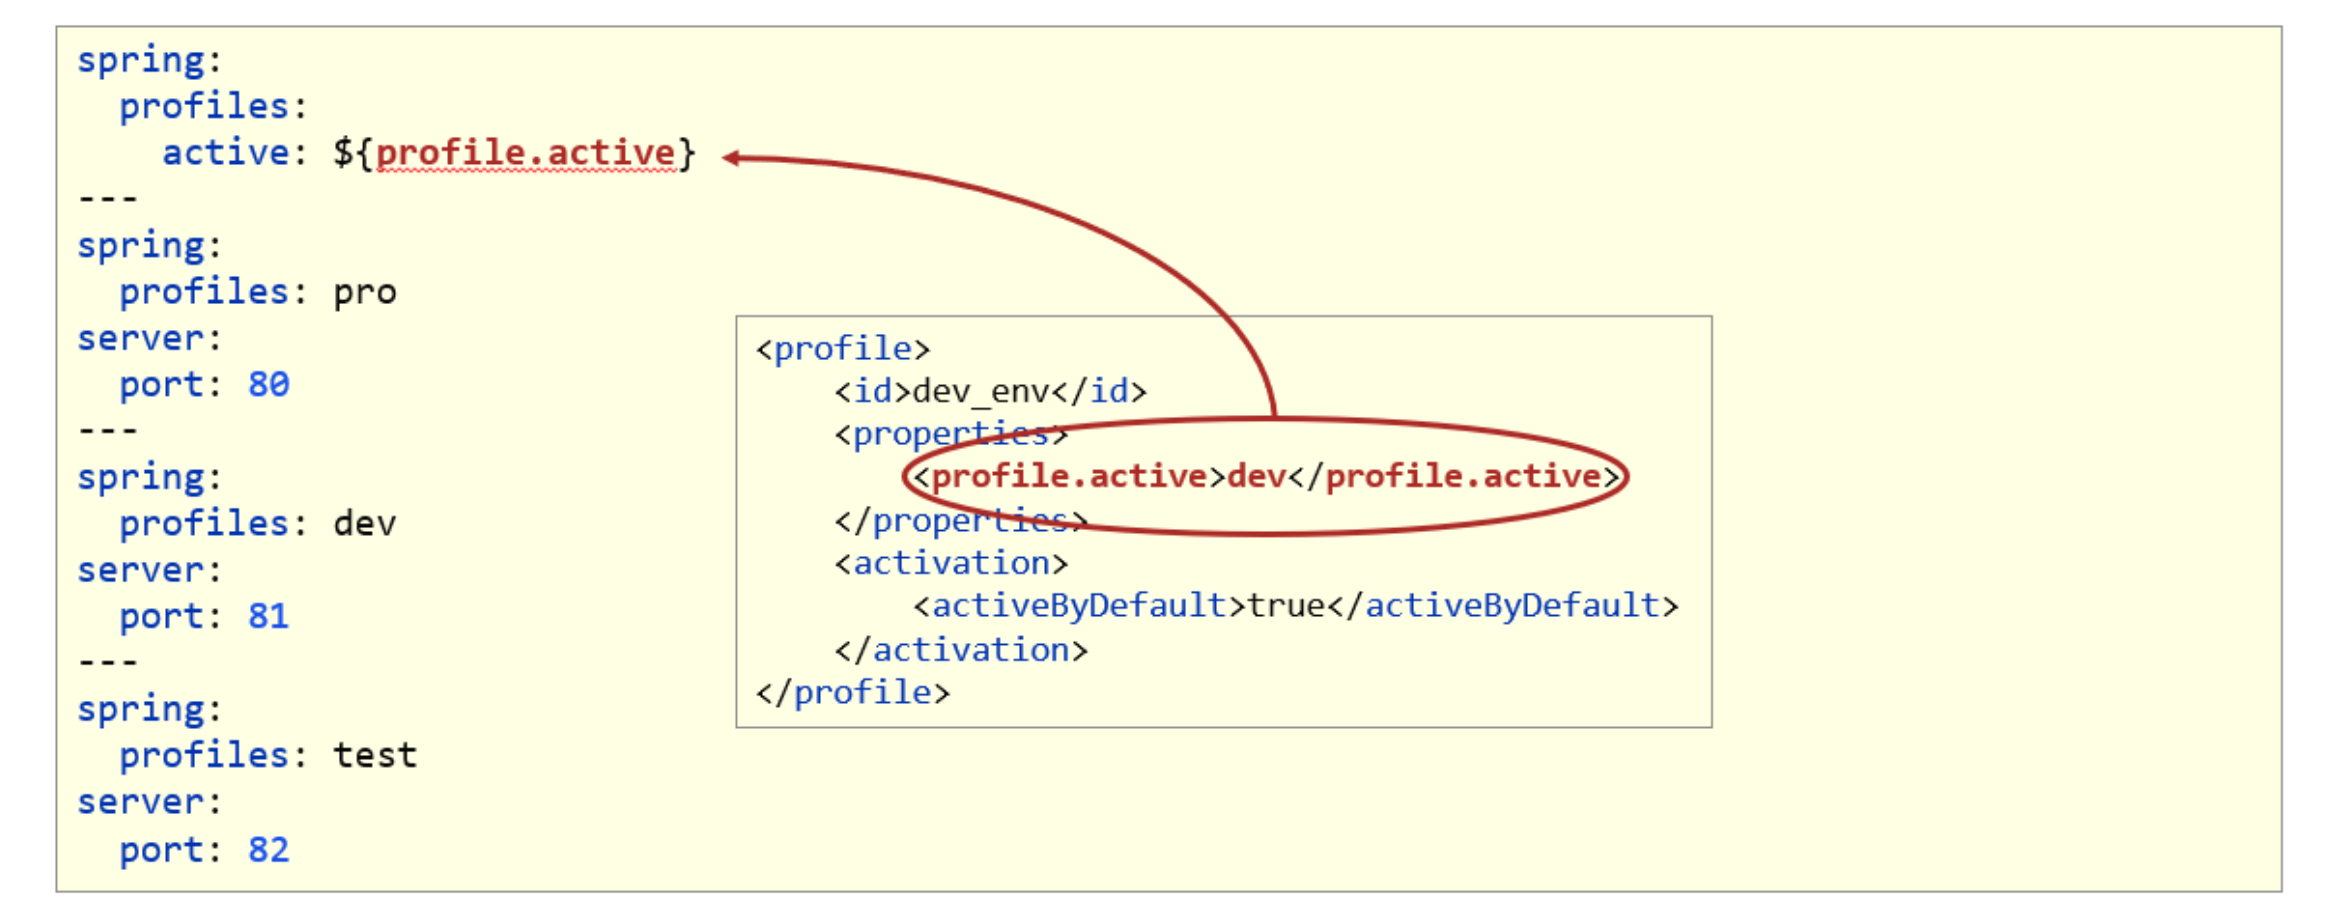
3.3 多环境开发控制
Maven与SpringBoot多环境兼容(步骤)
①:Maven中设置多环境属性
dev_env dev true pro_env pro test_env test ②:SpringBoot中引用Maven属性
③:执行Maven打包指令
-
Maven指令执行完毕后,生成了对应的包,其中类参与编译,但是配置文件并没有编译,而是复制到包中

-
解决思路:对于源码中非java类的操作要求加载Maven对应的属性,解析${}占位符
④:对资源文件开启对默认占位符的解析
maven-resources-plugin utf-8 true - Maven打包加载到属性,打包顺利通过

4. 配置文件分类
问题导入
SpringBoot的配置文件可以放在项目的哪些地方?

java –jar springboot.jar --spring.profiles.active=test --server.port=85 --server.servlet.context-path=/heima --server.tomcat.connection-timeout=-1 ... ...
-
SpringBoot中4级配置文件
1级: file :config/application.yml 【最高】
2级: file :application.yml
3级:classpath:config/application.yml
4级:classpath:application.yml 【最低】
-
作用:
1级与2级留做系统打包后设置通用属性
3级与4级用于系统开发阶段设置通用属性
三、整合第三方技术
1. 整合JUnit
问题导入
回忆一下Spring整合JUnit的步骤?
1.1 Spring整合JUnit(复习)
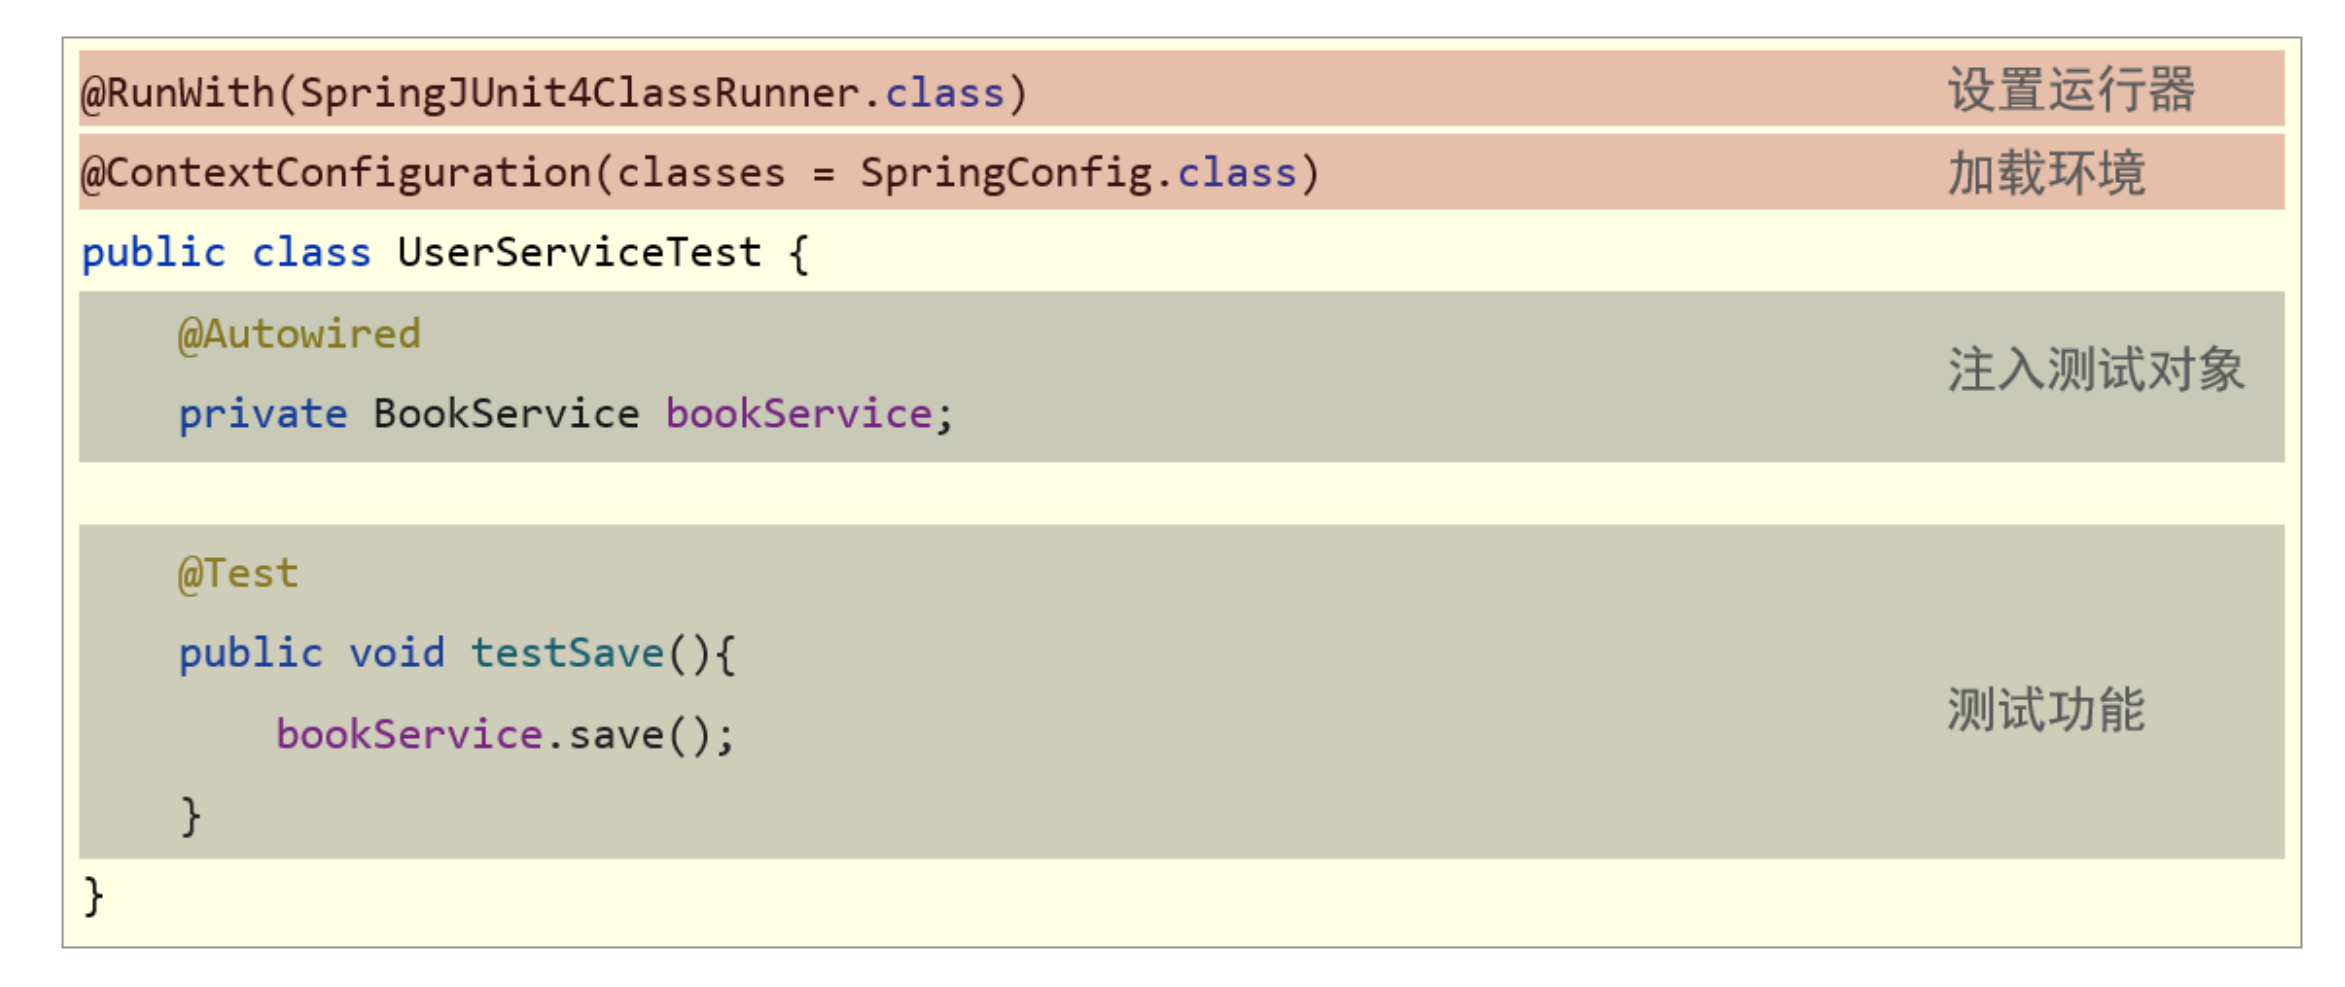
1.2 SpringBoot整合JUnit
【第一步】添加整合junit起步依赖(可以直接勾选)
org.springframework.boot spring-boot-starter-test test
【第二步】编写测试类,默认自动生成了一个
@SpringBootTest
class Springboot07JunitApplicationTests {@Autowiredprivate BookService bookService;@Testpublic void testSave() {bookService.save();}
}
2. 基于SpringBoot实现SSM整合
问题导入
回忆一下Spring整合MyBatis的核心思想?
2.1 Spring整合MyBatis(复习)
- SpringConfig
- 导入JdbcConfig
- 导入MyBatisConfig
@Configuration
@ComponentScan("com.itheima")
@PropertySource("classpath:jdbc.properties")
@Import({JdbcConfig.class, MyBatisConfig.class})
public class SpringConfig {}
- JDBCConfig
- 定义数据源(加载properties配置项:driver、url、username、password)
#jdbc.properties
jdbc.driver=com.mysql.jdbc.Driver
jdbc.url=jdbc:mysql://localhost:3306/spring_db
jdbc.username=root
jdbc.password=itheima
public class JdbcConfig {@Value("${jdbc.driver}")private String driver;@Value("${jdbc.url}")private String url;@Value("${jdbc.username}")private String userName;@Value("${jdbc.password}")private String password;@Beanpublic DataSource getDataSource() {DruidDataSource ds = new DruidDataSource();ds.setDriverClassName(driver);ds.setUrl(url);ds.setUsername(userName);ds.setPassword(password);return ds;}
}- MyBatisConfig
- 定义SqlSessionFactoryBean
- 定义映射配置
@Bean
public SqlSessionFactoryBean getSqlSessionFactoryBean(DataSource dataSource) {SqlSessionFactoryBean ssfb = new SqlSessionFactoryBean();ssfb.setTypeAliasesPackage("com.itheima.domain");ssfb.setDataSource(dataSource);return ssfb;
}
@Bean
public MapperScannerConfigurer getMapperScannerConfigurer() {MapperScannerConfigurer msc = new MapperScannerConfigurer();msc.setBasePackage("com.itheima.dao");return msc;
}
2.2 SpringBoot整合MyBatis
- SpringBoot整合Spring(不存在)
- SpringBoot整合SpringMVC(不存在)
- SpringBoot整合MyBatis(主要)
①:创建新模块,选择Spring初始化,并配置模块相关基础信息
②:选择当前模块需要使用的技术集(MyBatis、MySQL)
③:设置数据源参数
spring:datasource:driver-class-name: com.mysql.cj.jdbc.Driverurl: jdbc:mysql://localhost:3306/ssm_db?serverTimezone=UTCusername: rootpassword: roottype: com.alibaba.druid.pool.DruidDataSource
注意事项:
- SpringBoot版本低于2.4.3(不含),Mysql驱动版本大于8.0时,需要在url连接串中配置时区,或在MySQL数据库端配置时区解决此问题
jdbc:mysql://localhost:3306/ssm_db?serverTimezone=UTC
④:定义数据层接口与映射配置
@Mapper
public interface UserDao {@Select("select * from tbl_book where id=#{id}")Book getById(Integer id);
}
⑤:测试类中注入dao接口,测试功能
@SpringBootTest
class Springboot08MybatisApplicationTests {@Autowiredprivate BookDao bookDao;@Testpublic void testGetById() {Book book = bookDao.getById(1);System.out.println(book);}
}
2.3 案例-SpringBoot实现ssm整合
【第一步】创建SpringBoot工程,添加druid依赖
com.alibaba druid 1.2.6
【第二步】复制springmvc_11_page工程各种资源(主java类、页面、测试类)
【第三步】删除config包中的所有配置,在BookDao接口上加@Mapper注解
//todo 3 在BookDao接口上加@Mapper注解,让SpringBoot给接口创建代理对象
@Mapper
public interface BookDao {//...
}
【第四步】将application.properties修改成application.yml,配置端口号和连接参数
server:port: 80
# todo 4 配置数据库连接参数
spring:datasource:driver-class-name: com.mysql.cj.jdbc.Driverurl: jdbc:mysql://localhost:3306/ssm_dbusername: rootpassword: roottype: com.alibaba.druid.pool.DruidDataSource
【第五步】修改BookServiceTest配置类,进行配置
// todo 5 修改单元测试类,添加@SpringBootTest主键,修复@Test注解导包
@SpringBootTest
public class BookServiceTest {@Autowiredprivate BookService bookService;@Testpublic void testGetById(){Book book = bookService.getById(2); //传递参数1会抛出异常System.out.println(book);}@Testpublic void testGetAll(){List all = bookService.getAll();System.out.println(all);}
}
【第六步】在static目录中提供index.html页面,跳转到"pages/books.html"
最后:运行引导类即可访问