使用pluginRegistrationTool注册插件
迪丽瓦拉
2024-05-31 03:34:52
0次
创建插件项目
打开Visual Studio并使用.NET Framework 4.5.2打开一个新的类库(.NET Framework)项目

安装除了画红圈的三个NuGet包

引用这个

在一个类里输入如下代码
public class FollowupPlugin : IPlugin{public void Execute(IServiceProvider serviceProvider){// Obtain the tracing serviceITracingService tracingService =(ITracingService)serviceProvider.GetService(typeof(ITracingService));// Obtain the execution context from the service provider. IPluginExecutionContext context = (IPluginExecutionContext)serviceProvider.GetService(typeof(IPluginExecutionContext));// The InputParameters collection contains all the data passed in the message request. if (context.InputParameters.Contains("Target") &&context.InputParameters["Target"] is Entity){// Obtain the target entity from the input parameters. Entity entity = (Entity)context.InputParameters["Target"];// Obtain the organization service reference which you will need for // web service calls. IOrganizationServiceFactory serviceFactory =(IOrganizationServiceFactory)serviceProvider.GetService(typeof(IOrganizationServiceFactory));IOrganizationService service = serviceFactory.CreateOrganizationService(context.UserId);try{// Create a task activity to follow up with the account customer in 7 days. Entity followup = new Entity("task");followup["subject"] = "Send e-mail to the new customer.";followup["description"] ="Follow up with the customer. Check if there are any new issues that need resolution.";followup["scheduledstart"] = DateTime.Now.AddDays(7);followup["scheduledend"] = DateTime.Now.AddDays(7);followup["category"] = context.PrimaryEntityName;// Refer to the account in the task activity.if (context.OutputParameters.Contains("id")){Guid regardingobjectid = new Guid(context.OutputParameters["id"].ToString());string regardingobjectidType = "account";followup["regardingobjectid"] =new EntityReference(regardingobjectidType, regardingobjectid);}// Create the task in Microsoft Dynamics CRM.tracingService.Trace("FollowupPlugin: Creating the task activity.");service.Create(followup);}catch (FaultException ex){throw new InvalidPluginExecutionException("An error occurred in FollowUpPlugin.", ex);}catch (Exception ex){tracingService.Trace("FollowUpPlugin: {0}", ex.ToString());throw;}}}} 将以下语句添加到文件顶部
using System.ServiceModel;
using Microsoft.Xrm.Sdk;
在 Visual Studio 中,按 F6 生成程序集。验证它编译时没有错误。
在“解决方案资源管理器”中,右键单击 BasicPlugin 项目,然后在上下文菜单中选择“属性”

在项目属性中,选择“签名”选项卡,然后选中“为程序集签名”复选框

-
在“选择强名称密钥文件:”下拉列表中,选择<新建...>。
-
在“创建强名称密钥”对话框中,输入密钥文件名并取消选中“使用密码保护我的密钥文件”复选框。
-
单击“确定”关闭“创建强名称密钥”对话框。
-
在项目属性“生成”选项卡中,验证“配置”是否设置为“调试”。
-
按 F6 再次生成插件。
-
使用 Windows 资源管理器,在以下位置找到内置插件:。
\bin\Debug\BasicPlugin.dll
对插件进行签名
打开pluginRegistrationTool,连接,方法可以参考我上一个博客
在“注册”下拉列表中,选择“新建程序集”。

在“注册新程序集”对话框中,选择省略号 (...) 按钮并浏览生成的程序集。

对于 Microsoft 365 用户,请验证隔离模式是否设置为沙盒,并且存储程序集的位置是否为“数据库”。
单击注册所选插件。
您将看到“已注册插件”确认对话框。


右键单击(插件)BasicPlugin.FollowUpPlugin,然后选择注册新步骤。

在“注册新步骤”对话框中,设置以下字段:
| 设置 | 价值 |
|---|---|
| 消息 | 创造 |
| 主要实体 | 帐户 |
| 事件管道执行阶段 | 术后操作 |
| 执行模式 | 异步 |
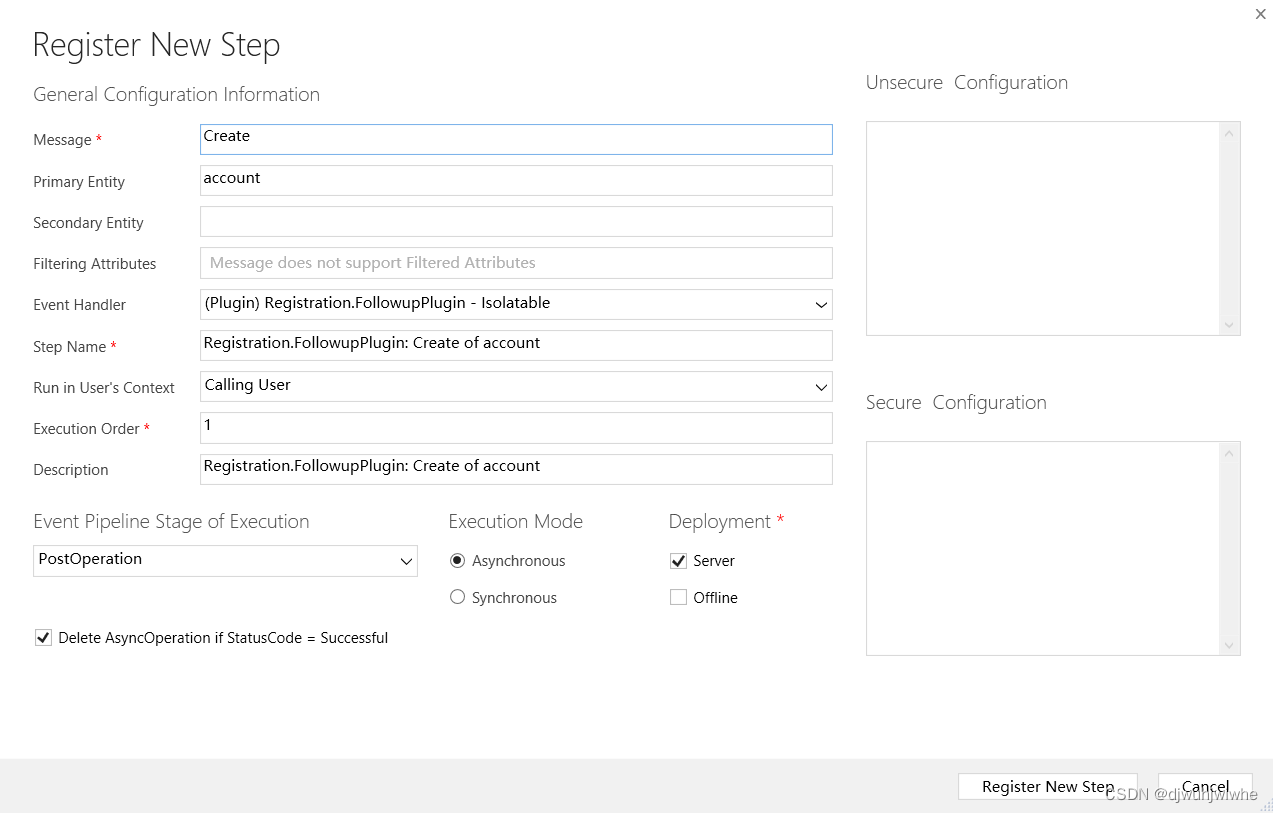
单击“注册新步骤”以完成注册并关闭“注册新步骤”对话框。
现在,可以看到已注册的步骤

相关内容
热门资讯
Linux-scheduler...
四、调度域 SDTL结构 linux内核使用SDTL结构体来组织CPU的层次关系 struct sc...
leetcode - 2379...
Description You are given a 0-indexed string block...
Retinanet网络与foc...
参考代码:https://github.com/yhenon/pytorch-reti...