SpringBoot下的Spring框架学习(Tedu)——DAY02
SpringBoot下的Spring框架学习(Tedu)——DAY02
目录
- SpringBoot下的Spring框架学习(Tedu)——DAY02
- Spring框架学习
- 1.1 Spring介绍
- 1.2 知识铺垫
- 1.2.1 编辑Dog类
- 1.2.2 编辑Cat类
- 1.2.3 编辑测试类User.java
- 1.2.4 上述代码的总结
- 1.3 面向接口编程
- 1.3.1 面向接口编程说明
- 1.3.2 代码结构
- 1.4 Spring-IOC规则
- 1.4.1 面向接口编程弊端
- 1.4.2 IOC调用原理图
- 1.5 Spring-IOC 入门案例
- 1.5.1 准备Dog类
- 1.5.2 准备spring的配置文件
- 1.5.3 准备测试类SpringGetDog
- 1.5.4 测试结果
- 1.5.5 核心问题-spring如何创建对象
- 1.6 Spring-IOC 注解开发
- 1.6.1 关于注解开发说明
- 1.6.2 编辑Cat类
- 1.6.3 编辑配置类
- 1.6.4 编辑测试类
- 1.7 Spring中的单例-多例模式
- 1.7.1 概念说明
- 1.7.2 关于注解@Scope
- 1.8 Spring中懒加载策略
- 1.8.1 关于懒加载说明
- 1.8.2 测试类
- 1.8.3 排列组合方案
- 1.8.3.1 没有 设置@Lazy注解 单例@Scope(“singleton”)
- 1.8.3.2设置@Lazy注解 单例@Scope(“singleton”)
- 小结:@Scope("singleton")单例默认是饿汉式,添加上@Lazy注解,变成懒汉式。
- 1.8.3.3 没有 设置@Lazy注解 多例@Scope("prototype")
- 1.8.3.4 设置@Lazy注解 多例@Scope("prototype")
- 小结:@Scope("prototype")为懒加载,懒加载@Lazy注解对其没有效果
- 总结:@Lazy 只能控制单例模式, 多例模式都是懒加载.
- 1.9 Spring生命周期
- 1.9.1 创建Snake对象
- 1.9.2 将Snake交给Spring容器管理
- 1.9.3 生命周期方法测试
- 1.9.4 测试结果
- 1.10 注解总结
Spring框架学习
1.1 Spring介绍
Spring框架是一个开放源代码的J2EE应用程序框架,由Rod Johnson发起,是针对bean的生命周期进行管理的轻量级容器(lightweight container)。
Spring解决了开发者在J2EE开发中遇到的许多常见的问题,提供了功能强大IOC、AOP及Web MVC等功能。Spring可以单独应用于构筑应用程序,也可以和Struts、Webwork、Tapestry等众多Web框架组合使用,并且可以与 Swing等桌面应用程序AP组合。因此, Spring不仅仅能应用于JEE应用程序之中,也可以应用于桌面应用程序以及小应用程序之中。Spring框架主要由七部分组成,分别是 Spring Core、 Spring AOP、 Spring ORM、 Spring DAO、Spring Context、 Spring Web和 Spring Web MVC。
知识补充:
1.J2SE java基础 ;J2EE java企业级开发 ;J2ME 移动端开发
2. bean: spring容器管理的对象称之为bean
3. 生命周期: 对象创建/对象的初始化/对象执行业务逻辑/对象销毁
4. 轻量级容器: Spring在内存中申请了一块内存空间,用来存储其它对象.
1.2 知识铺垫
1.2.1 编辑Dog类
public class Dog {public void hello(){System.out.println("你好,我是小狗汪汪汪");}
}
1.2.2 编辑Cat类
public class Cat {public void hello(){System.out.println("你好,我是小猫喵喵喵");}
}
1.2.3 编辑测试类User.java
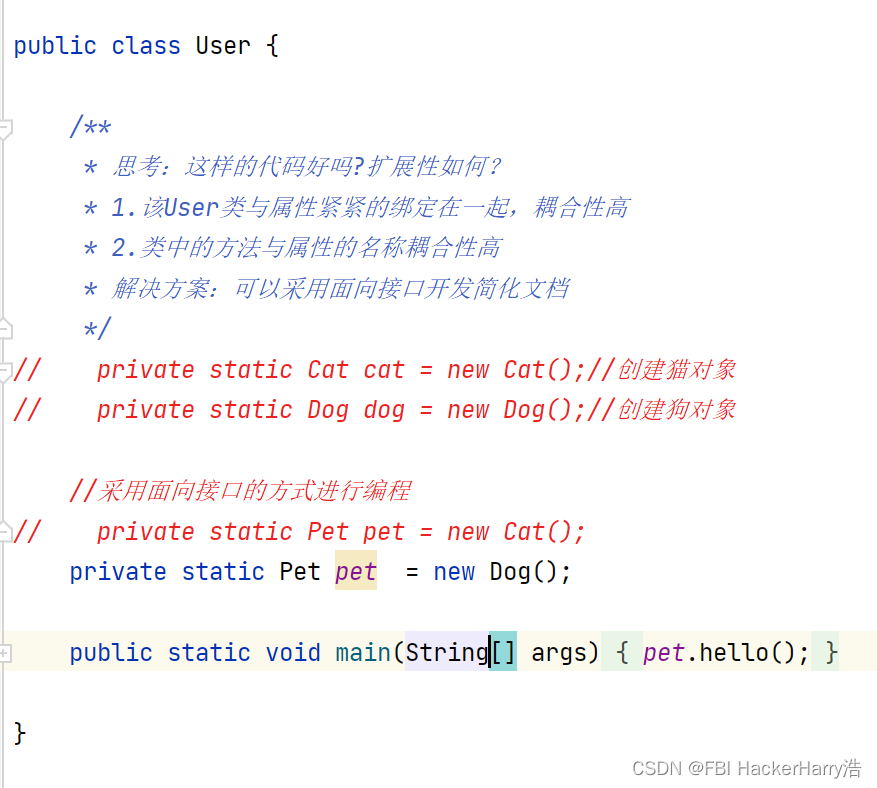
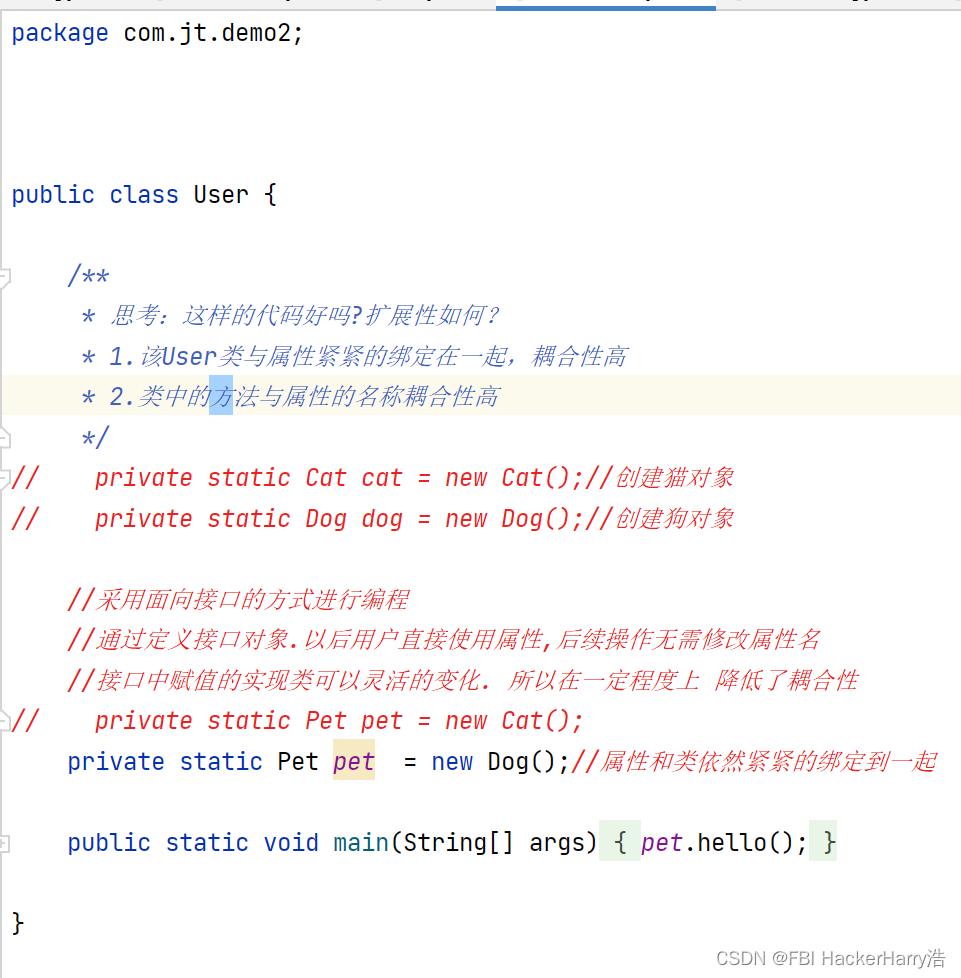
package com.jt.demo1;import javax.print.attribute.standard.PrinterURI;public class User {/*** 思考:这样的代码好吗?扩展性如何?* 1.该User类与属性紧紧的绑定在一起,耦合性高* 2.类中的方法与属性的名称耦合性高*/private static Cat cat = new Cat();//创建猫对象private static Dog dog = new Dog();//创建狗对象public static void main(String[] args) {
//        cat.hello();dog.hello();}}
1.2.4 上述代码的总结
1、该User类与属性紧紧的绑定在一起. 耦合性高
2、类中的方法与属性的名称绑定在一起. 耦合性高.
1.3 面向接口编程
1.3.1 面向接口编程说明
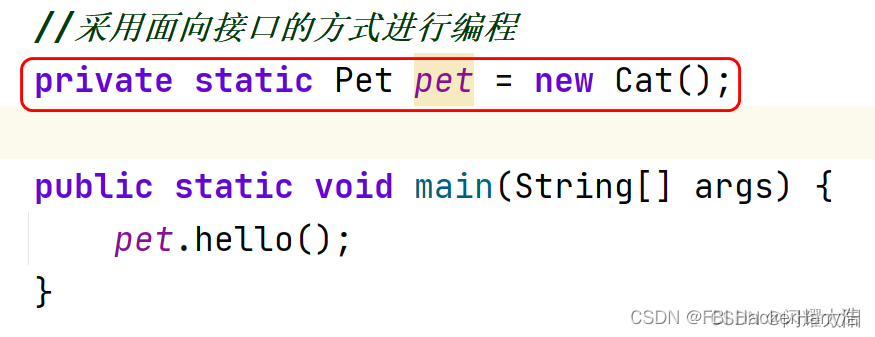
说明: 将子类中的方法 进行高级的抽取,抽取到接口中. 这时该接口用来定义行为规范准则.
面向接口编程优势: 解决了属性与方法名的耦合.以后几乎可以不修改属性名
1.3.2 代码结构
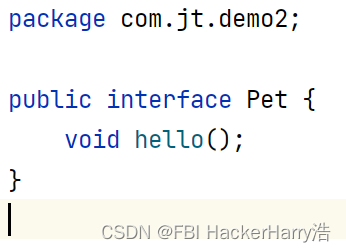
1.定义Pet 接口
2.定义Dog类

3.定义Cat类

4.定义测试类
1.4 Spring-IOC规则
1.4.1 面向接口编程弊端
说明: 虽然面向接口编程可以在一定程度上解决代码耦合性的问题.但是根源问题没有解决.
当前的User类与Cat等对象 紧紧的耦合在一起.如果后期维护,则必然要修改源码.
1.4.2 IOC调用原理图
Ioc全称Inversion of Control,即“控制反转”,这是一种设计思想。对象创建的权利由Spring框架完成.由容器管理对象的生命周期,需要的时候进行依赖注入(DI)即可.

1.5 Spring-IOC 入门案例
1.5.1 准备Dog类
package com.jt.demo2;public class Dog {public void hello(){System.out.println("小狗 交给Spring容器管理");}
}
1.5.2 准备spring的配置文件
说明: spring早期都使用配置文件的方式来管理对象.但是随着软件的升级当下注解的方式已经成为主流. 所以先完成xml配置文件的方式,之后完成注解的方式.
内容说明: xml文件 一般都会有固定的头标签
resources文件夹下
spring.xml
1.5.3 准备测试类SpringGetDog
package com.jt.demo3;import org.springframework.context.ApplicationContext;
import org.springframework.context.support.ClassPathXmlApplicationContext;public class SpringGetDog {//该类表示成spring容器中,动态获取Dog对象public static void main(String[] args) {//1.指定spring配置文件路径String resource = "spring.xml";//2.启动spring容器ApplicationContext applicationContext = new ClassPathXmlApplicationContext(resource);//3.从容器中获取对象 必须强制类型转化Dog dog1 = (Dog) applicationContext.getBean("dog");Dog dog2 = applicationContext.getBean(Dog.class);System.out.println(dog1);//输出的是地址System.out.println(dog2);System.out.println(dog1 == dog2);System.out.println(dog1.equals(dog2));//4.对象调用方法dog1.hello();dog2.hello();}}
1.5.4 测试结果

1.5.5 核心问题-spring如何创建对象
说明: 默认条件下,Spring容器启动时,就会创建对象,如果创建对象的过程中,出现问题.则容器启动失败

package com.jt.demo3;import org.springframework.context.ApplicationContext;
import org.springframework.context.support.ClassPathXmlApplicationContext;public class SpringGetDog {//该类表示成spring容器中,动态获取Dog对象public static void main(String[] args) {//1.指定spring配置文件路径String resource = "spring.xml";//2.启动spring容器ApplicationContext applicationContext = new ClassPathXmlApplicationContext(resource);//3.从容器中获取对象 必须强制类型转化Dog dog1 = (Dog) applicationContext.getBean("dog");Dog dog2 = applicationContext.getBean(Dog.class);System.out.println(dog1);//输出的是地址System.out.println(dog2);System.out.println(dog1 == dog2);System.out.println(dog1.equals(dog2));//4.对象调用方法dog1.hello();dog2.hello();//利用反射机制获取对象getDog();}/*** Spring实例化对象的核心原理-反射机制* 注意事项:反射代码 必然会调用对象的无参构造方法*/public static void getDog(){try {Dog dog = (Dog) Class.forName("com.jt.demo3.Dog").newInstance();dog.hello();} catch (InstantiationException e) {e.printStackTrace();} catch (IllegalAccessException e) {e.printStackTrace();} catch (ClassNotFoundException e) {e.printStackTrace();}}}
给dog类添加无参构造方法
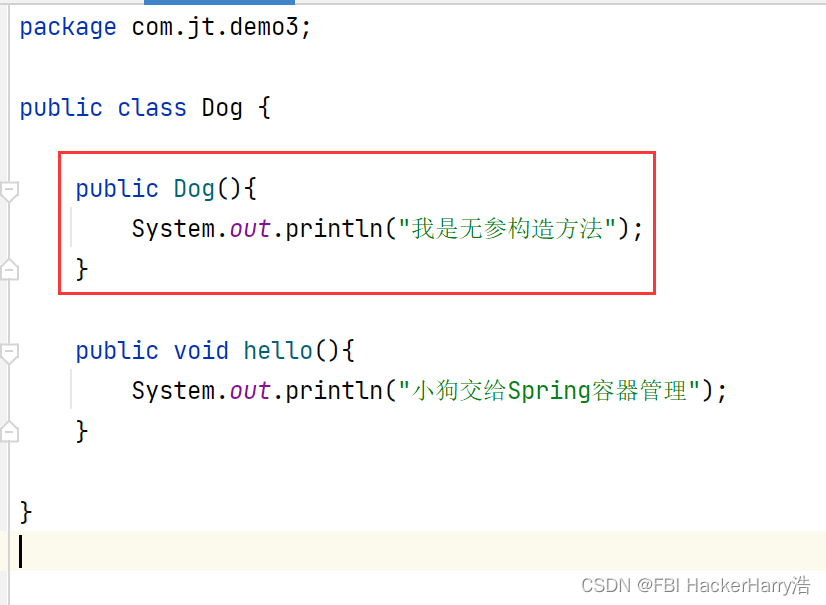
package com.jt.demo3;public class Dog {public Dog(){System.out.println("我是无参构造方法");}public void hello(){System.out.println("小狗交给Spring容器管理");}}再次运行测试

Spring创建对象的步骤:
- 定义spring的配置文件的地址
- Spring容器启动时加载指定的配置文件
- 当Spring扫描到bean标签时,加载属性id和class
- 根据反射机制 根据class的路径反射实例化对象
- Spring在内部维护了一个大型的Map
- 从spring容器中通过Id或者class类型 获取对象.
- 根据对象调用业务方法.
1.6 Spring-IOC 注解开发
1.6.1 关于注解开发说明
传统Spring框架采用xml配置文件的方式进行维护.但是随着springboot框架的崛起,注解开发渐渐的成为主流.所以将来以注解开发为准.
组成部分:
- 实体类: Spring容器管理的类(对象)
- 配置类: 相当于早期的xml配置文件
- 测试代码: 利用注解的方式启动spring容器
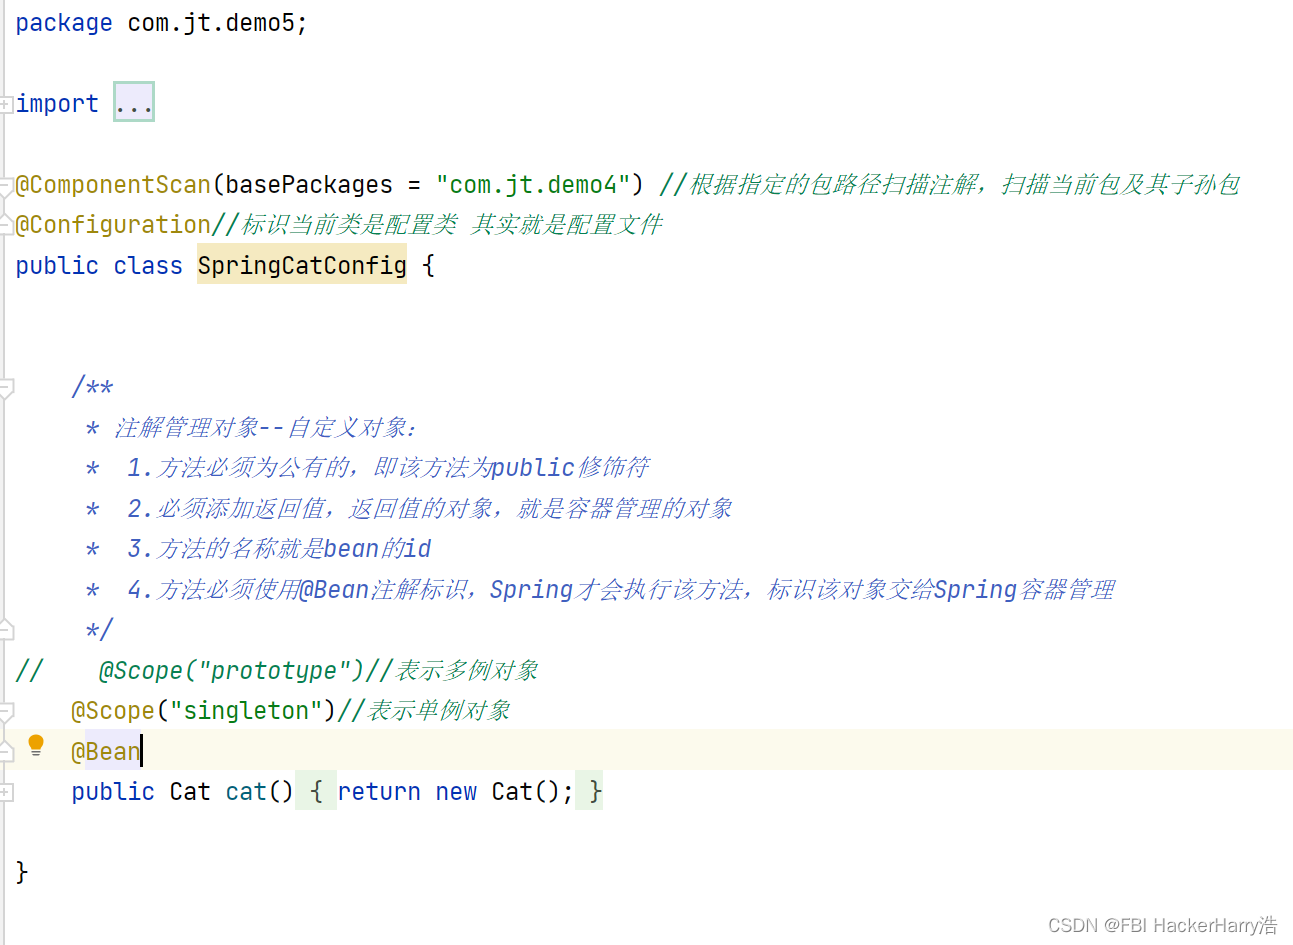
1.6.2 编辑Cat类
package com.jt.demo4;public class Cat {public Cat() {System.out.println("我是demo3里面的Cat的无参构造");}public void hello(){System.out.println("小花猫 喵喵喵");}}1.6.3 编辑配置类
package com.jt.demo4;import org.springframework.context.annotation.Bean;
import org.springframework.context.annotation.ComponentScan;
import org.springframework.context.annotation.Configuration;@ComponentScan(basePackages = "com.jt.demo4") //根据指定的包路径扫描注解,扫描当前包及其子孙包
@Configuration//标识当前类是配置类 其实就是配置文件
public class SpringCatConfig {/*** 注解管理对象--自定义对象:*  1.方法必须为公有的,即该方法为public修饰符*  2.必须添加返回值,返回值的对象,就是容器管理的对象*  3.方法的名称就是bean的id*  4.方法必须使用@Bean注解标识,Spring才会执行该方法,标识该对象交给Spring容器管理*/@Beanpublic Cat cat(){return new Cat();}}
1.6.4 编辑测试类
package com.jt.demo4;import org.springframework.context.ApplicationContext;
import org.springframework.context.annotation.AnnotationConfigApplicationContext;public class SpringAnno {public static void main(String[] args) {//利用注解启动spring容器ApplicationContext applicationContext = new AnnotationConfigApplicationContext(SpringCatConfig.class);//根据类型获取对象Cat cat = applicationContext.getBean(Cat.class);cat.hello();}
}
1.7 Spring中的单例-多例模式
1.7.1 概念说明
单例模式: 内存中的对象就一份.
多例模式: 内存中的对象有多份.
概念说明: Spring中的对象默认是单例的.
1.7.2 关于注解@Scope
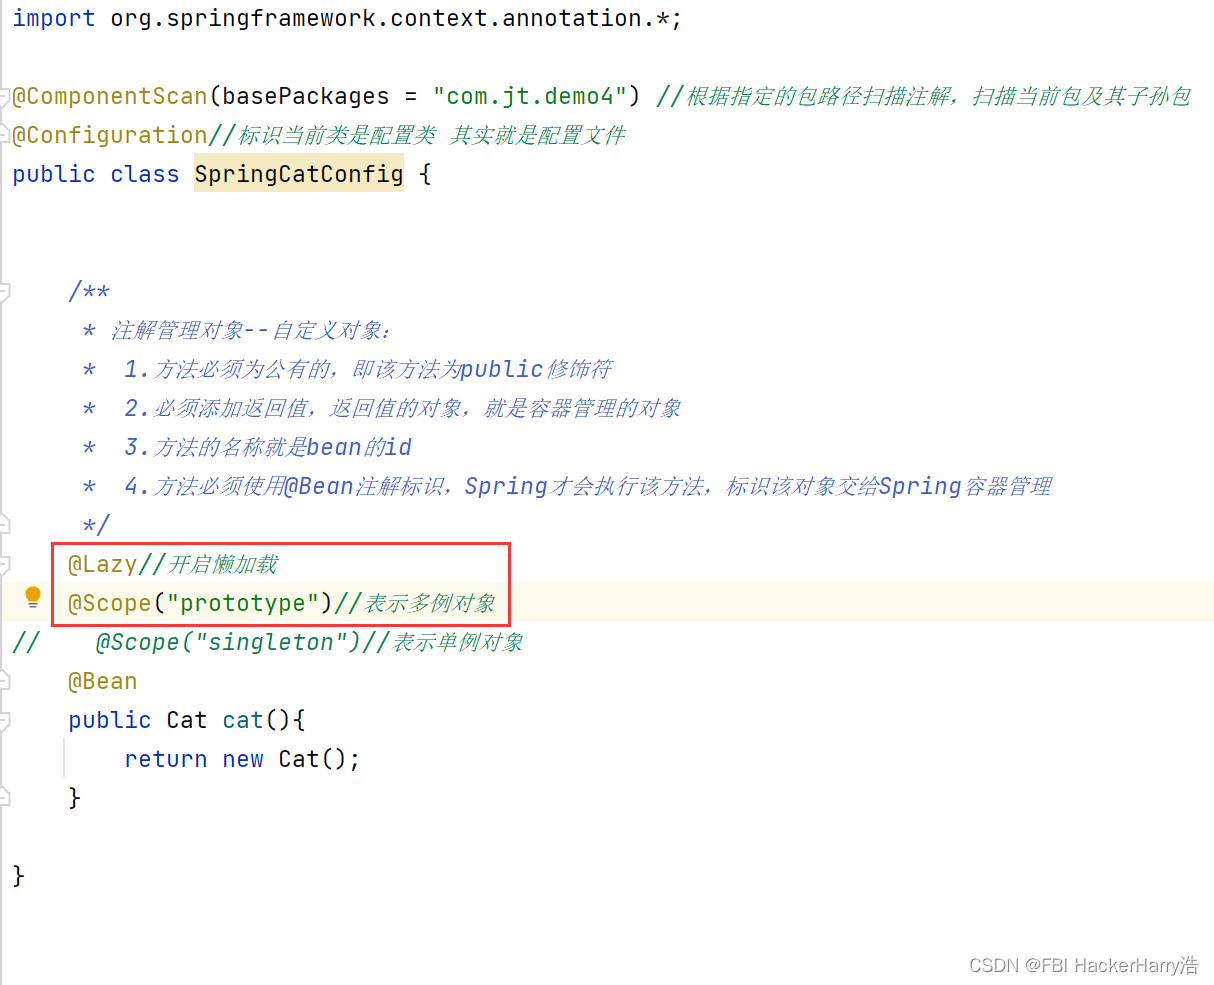
@Scope(“prototype”)//表示多例对象
配置类
SpringCatConfig
package com.jt.demo5;import org.springframework.context.annotation.Bean;
import org.springframework.context.annotation.ComponentScan;
import org.springframework.context.annotation.Configuration;
import org.springframework.context.annotation.Scope;@ComponentScan(basePackages = "com.jt.demo4") //根据指定的包路径扫描注解,扫描当前包及其子孙包
@Configuration//标识当前类是配置类 其实就是配置文件
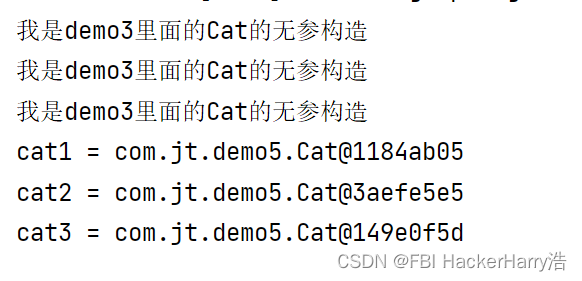
public class SpringCatConfig {/*** 注解管理对象--自定义对象:* 1.方法必须为公有的,即该方法为public修饰符* 2.必须添加返回值,返回值的对象,就是容器管理的对象* 3.方法的名称就是bean的id* 4.方法必须使用@Bean注解标识,Spring才会执行该方法,标识该对象交给Spring容器管理*/@Scope("prototype")//表示多例对象
// @Scope("singleton")//表示单例对象@Beanpublic Cat cat(){return new Cat();}}
测试类
package com.jt.demo5;import org.springframework.context.ApplicationContext;
import org.springframework.context.annotation.AnnotationConfigApplicationContext;public class SpringAnno {public static void main(String[] args) {//利用注解启动spring容器ApplicationContext applicationContext = new AnnotationConfigApplicationContext(SpringCatConfig.class);//根据类型获取对象Cat cat1 = applicationContext.getBean(Cat.class);Cat cat2 = applicationContext.getBean(Cat.class);Cat cat3 = applicationContext.getBean(Cat.class);System.out.println("cat1 = " + cat1);System.out.println("cat2 = " + cat2);System.out.println("cat3 = " + cat3);}
}
测试结果
@Scope(“singleton”)//表示单例对象
配置类
SpringCatConfig.java
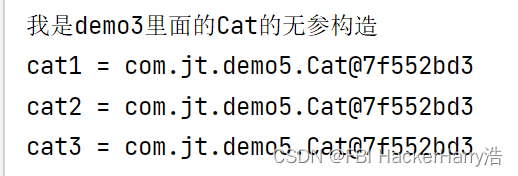
package com.jt.demo5;import org.springframework.context.annotation.Bean;
import org.springframework.context.annotation.ComponentScan;
import org.springframework.context.annotation.Configuration;
import org.springframework.context.annotation.Scope;@ComponentScan(basePackages = "com.jt.demo4") //根据指定的包路径扫描注解,扫描当前包及其子孙包
@Configuration//标识当前类是配置类 其实就是配置文件
public class SpringCatConfig {/*** 注解管理对象--自定义对象:*  1.方法必须为公有的,即该方法为public修饰符*  2.必须添加返回值,返回值的对象,就是容器管理的对象*  3.方法的名称就是bean的id*  4.方法必须使用@Bean注解标识,Spring才会执行该方法,标识该对象交给Spring容器管理*/
//    @Scope("prototype")//表示多例对象@Scope("singleton")//表示单例对象@Beanpublic Cat cat(){return new Cat();}}
测试类不变
测试结果
1.8 Spring中懒加载策略
1.8.1 关于懒加载说明
默认条件下,Spring容器启动,则会创建对象.(类比:饿汉式),如果开启了懒加载.则用户什么时候使用.则对象什么时候创建(类比:懒汉式).
注解: @Lazy
1.8.2 测试类
package com.jt.demo6;import org.springframework.context.ApplicationContext;
import org.springframework.context.annotation.AnnotationConfigApplicationContext;public class SpringAnno {public static void main(String[] args) {//利用注解启动spring容器System.out.println("------------------容器初始化开始-----------------------");ApplicationContext applicationContext = new AnnotationConfigApplicationContext(SpringCatConfig.class);System.out.println("------------------容器初始化结束-----------------------");//根据类型获取对象Cat cat1 = applicationContext.getBean(Cat.class);Cat cat2 = applicationContext.getBean(Cat.class);Cat cat3 = applicationContext.getBean(Cat.class);System.out.println("cat1 = " + cat1);System.out.println("cat2 = " + cat2);System.out.println("cat3 = " + cat3);}
}
1.8.3 排列组合方案
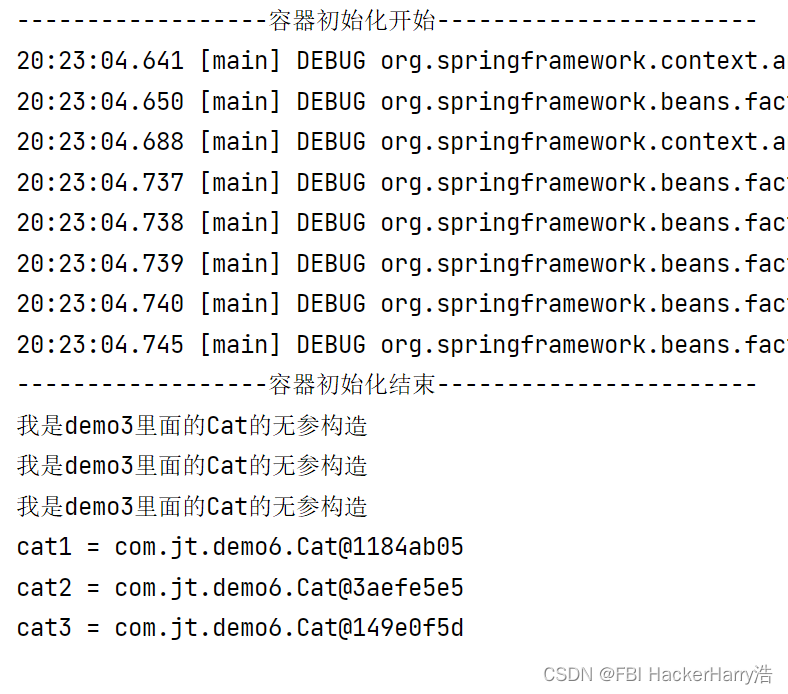
1.8.3.1 没有 设置@Lazy注解 单例@Scope(“singleton”)
运行测试类
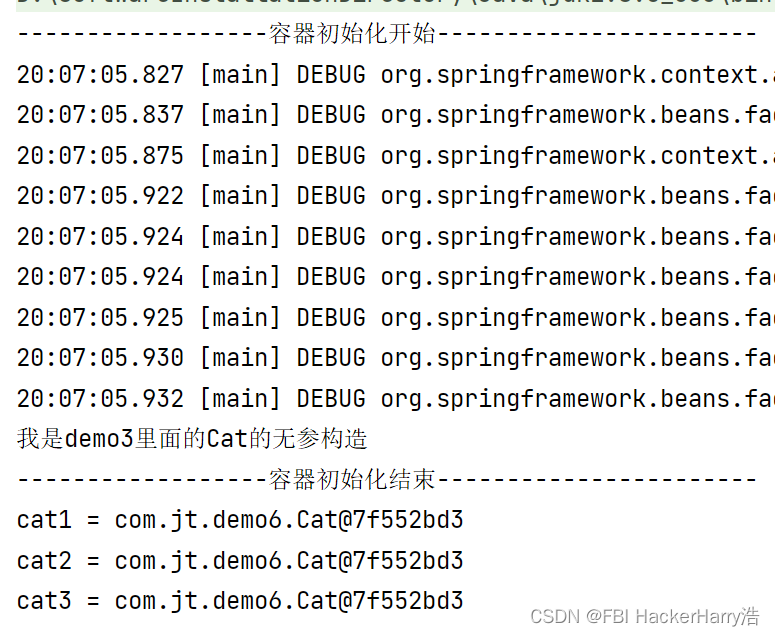
为饿汉式单例,对象在容器初始化结束之前创建
1.8.3.2设置@Lazy注解 单例@Scope(“singleton”)
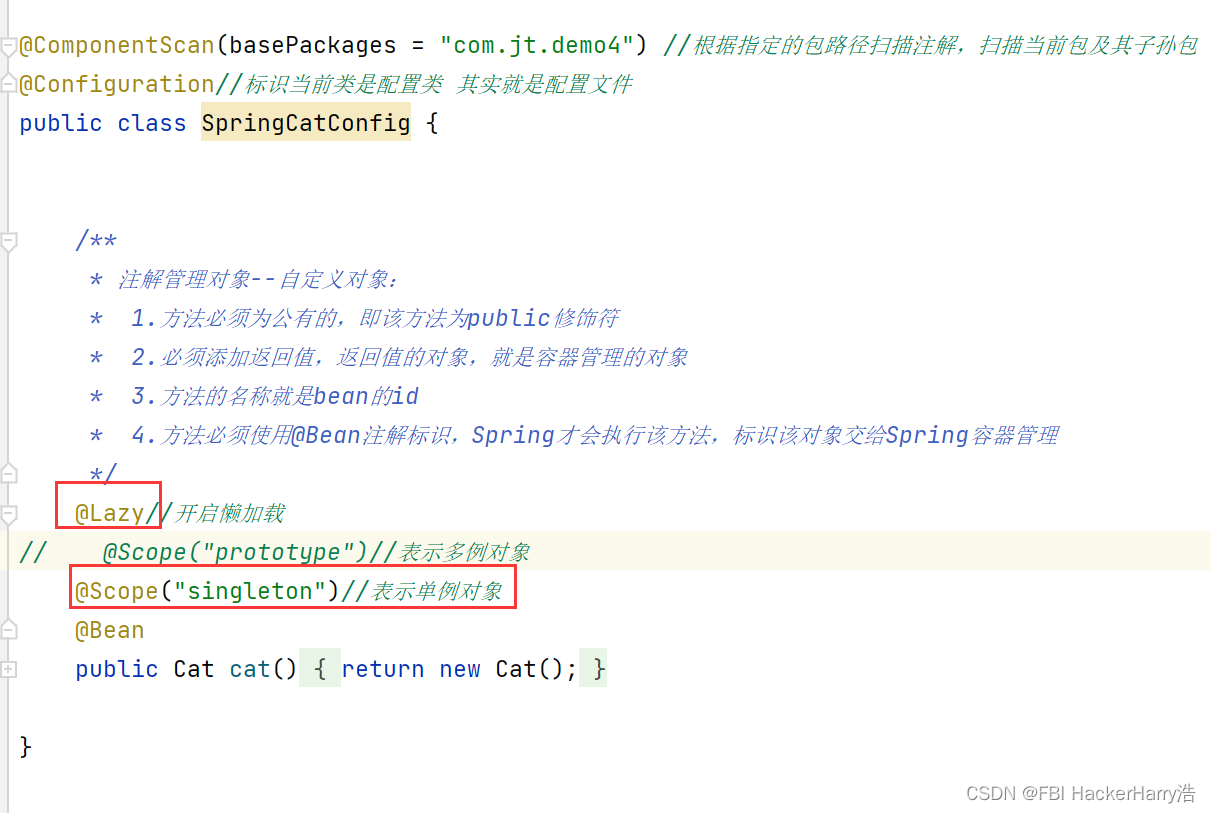
运行测试类
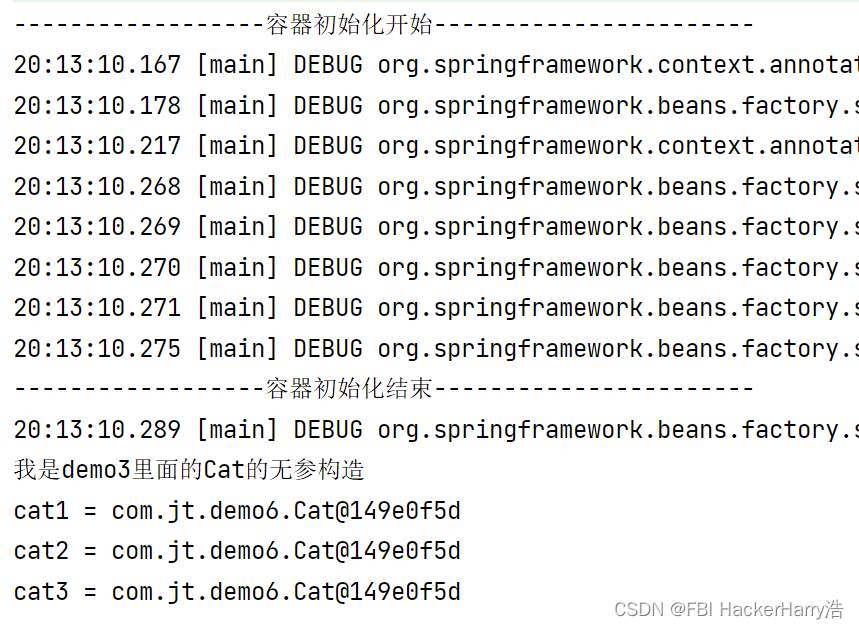
懒汉式单例,对象在容器初始化结束之后创建
小结:@Scope(“singleton”)单例默认是饿汉式,添加上@Lazy注解,变成懒汉式。
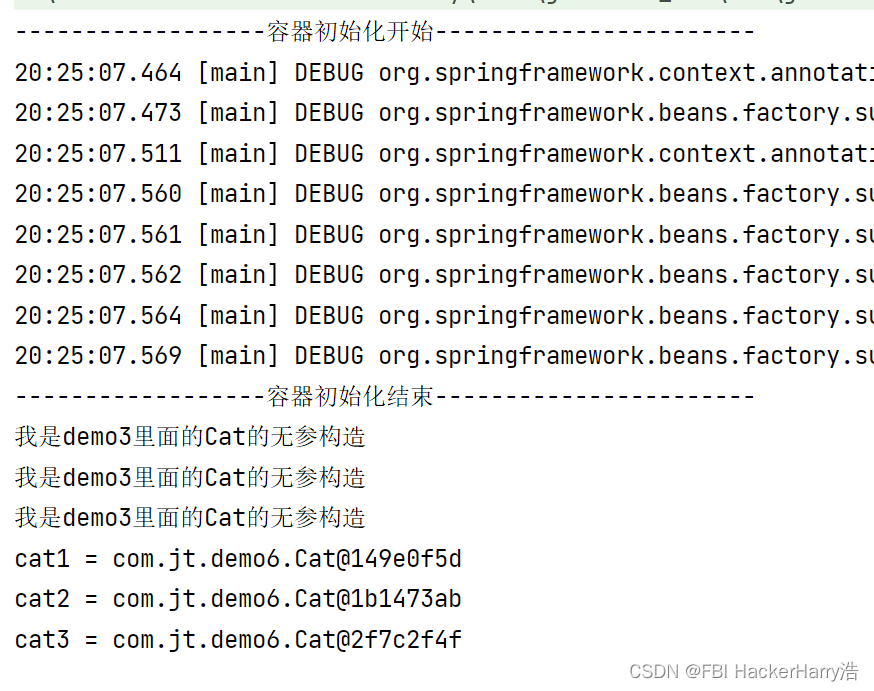
1.8.3.3 没有 设置@Lazy注解 多例@Scope(“prototype”)
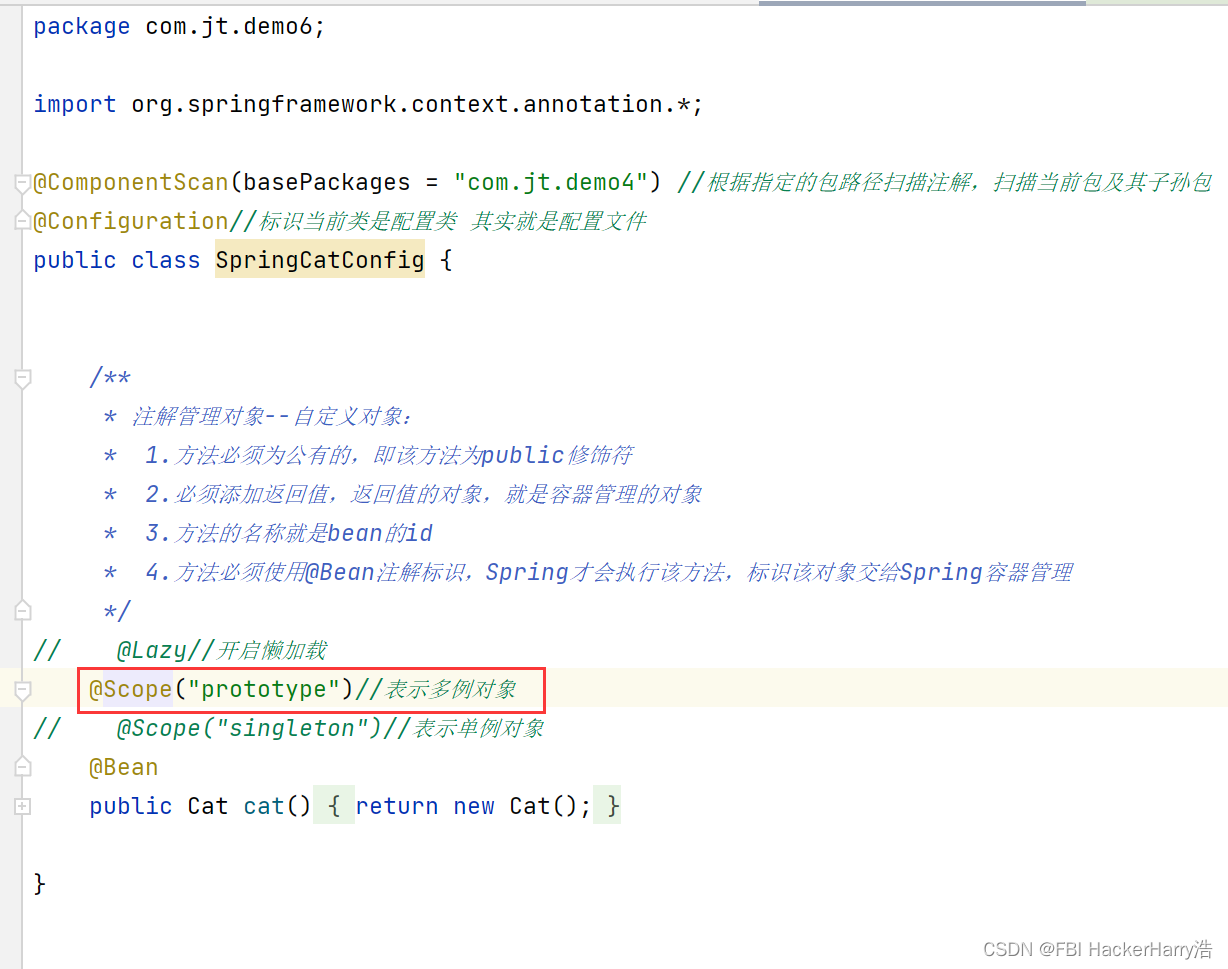
运行测试类
为懒加载
1.8.3.4 设置@Lazy注解 多例@Scope(“prototype”)
运行测试类
为懒加载
小结:@Scope(“prototype”)为懒加载,懒加载@Lazy注解对其没有效果
总结:@Lazy 只能控制单例模式, 多例模式都是懒加载.
1.9 Spring生命周期
阶段划分: 对象创建/初始化/业务调用/对象销毁
1.9.1 创建Snake对象
package com.jt.demo7;import javax.annotation.PostConstruct;
import javax.annotation.PreDestroy;public class Snake {//1.无参构造方法public Snake(){System.out.println("无参构造方法");}//2.初始化方法@PostConstructpublic void init(){System.out.println("我是init方法");}//3.业务方法public void eat(){System.out.println("我是业务方法,蛇四处觅食!!!");}//4.销毁方法@PreDestroypublic void destroy(){System.out.println("我是销毁方法");}
}
1.9.2 将Snake交给Spring容器管理
package com.jt.demo7;import org.springframework.context.annotation.Bean;
import org.springframework.context.annotation.ComponentScan;
import org.springframework.context.annotation.Configuration;@ComponentScan("com.jt.demo7")
@Configuration
public class SpringSnackConfig {@Beanpublic Snake snake(){return new Snake();}}
1.9.3 生命周期方法测试
package com.jt.demo7;import org.springframework.context.ApplicationContext;
import org.springframework.context.annotation.AnnotationConfigApplicationContext;/*** 测试bean的声明周期**/
public class SpringAnno {public static void main(String[] args) {/**ApplicationContext接口中没有提供close的方法,需要使用实现类进行操作*/AnnotationConfigApplicationContext annotationConfigApplicationContext = new AnnotationConfigApplicationContext(SpringSnackConfig.class);Snake snake = annotationConfigApplicationContext.getBean(Snake.class);snake.eat();//关闭容器即可annotationConfigApplicationContext.close();}
}
1.9.4 测试结果

1.10 注解总结
@Configuration 标识当前类是配置类
@ComponentScan 包扫描注解 扫描注解
@Bean 标识该方法的返回值交给Spring容器管理
@Scope 控制多例和单例
@Lazy 懒加载
@PostConstruct 初始化方法
@PreDestroy 销毁方法